
Warning: This is a very long post with lots of sewing talk. Which, you know, you’d kind of expect from a sewing blog. But consider yourself warned.
 My little brother was getting married. Obviously I was making a dress. Obviously it had to be awesome. Obviously I was also shooting the wedding (I do this for all my siblings and my husband’s siblings), so I had to be able to move around also.

I found these Alice McCall embroidered mesh panels at The Remnant Warehouse months and months ago. Oh yes, they were going to be awesome. The toughest decision was picking which colour to go with. At the same time, I ordered some nude coloured peach skin fabric to make the layers underneath.

As soon as I saw the panels, I knew that I didn’t want a standard lining, I wanted some skin to show through. But I also knew that straps wouldn’t be quite right either, so had visions of making a strapless dress to go underneath. Now, October in QLD can be quite warm, so I wasn’t too keen on wearing a heap of layers underneath (nor do I have a strapless bra that fits). In a confident leap, I decided to make my own strapless bra/skirt combo to go under the dress.

Construction of the actual dress wasn’t difficult. I used my own self drafted pattern because I knew it fitted me well, I’ve sewn it a lot and the mesh needed a relatively simple silhouette. Sorted. I used French seams where possible and then bound the seams at the waist and armholes with scraps of the mesh. I attached that by hand to keep it as invisible as possible.

It worked well and was quite pain free. I moved the zip placement from the back of the dress to the side seam, so I wouldn’t be cutting through the beautiful embroidery. I added strips of the mesh either side of the seam with the zip to give it a bit of extra strength. I didn’t hem the sleeves or skirt, but cut the mesh back close to the embroidery.

Honestly, the hardest part of the dress construction was the neckline. Originally I wanted to fold it over twice and hand sew it down invisibly, but I just couldn’t get it to sit flat, so ended up doing a rolled hem on my overlocker. Disaster struck when I lightly pressed that with the iron (the iron I’d been using on the same setting THE WHOLE TIME) and the neckline melted. I wanted to cry. So I had to cut the neckline down a bit more, which meant that the rolled hem now sits on the embroidery instead of just above. Not a big deal, but it annoys me. Turns out the thermostat (or whatever controls the temperature) in the iron had died and I had to bin the iron and buy a new one.

In an additional dick move, I didn’t think and hung the dress on a hanger between sewing sessions. Of course, the weight of the skirt stretched out the neckline and it no longer sat on my shoulders properly. I (CAREFULLY) tried to steam it back into place, which worked a little bit but didn’t fix it entirely. Google wasn’t much help either, so in the end I very carefully ran a thread through the back of the rolled hem at the front and back necklines, ever so slightly gathering them and tied them off at the shoulders. It worked and you can’t see it at all! Probably a very unconventional fix, but it worked.

Dress complete. Skirt and top to go. One of the things that gave me a bit of a shock about the nude mesh of the dress is exactly how nude it looks. Which I realise is a completely ridiculous statement, but I felt so exposed! Too exposed to go with the original nude fabric I had planned to go underneath. In the end I decided on silver instead, which is a sateen with a slight stretch I also bought from The Remnant Warehouse. Skirt was easy, so I started there. I went with a half circle because I didn’t want anymore bulk at the waist and used horsehair braid in the hem for a bit of kick (again, didn’t want to add anymore layers in the form of a petticoat).

Which left the bra. OMG. Now, I’m no stranger to bra sewing, but strapless bras are an entirely different beast. They defy gravity. The experts will tell you that the support of a bra doesn’t come from the straps, it actually comes from the band, but holy hell, they help. I’ve never had a RTW strapless bra fit me or stay put. And I think a lot of people are in the same boat. The cup and wire shape on a strapless bra is much more of a U than a C. Boning and a longer band helps a lot. Right. How hard could it be?

LOL. I started with Orange Lingerie’s Esplanade because I already owned it, I’d already sewn it (although not entirely successfully managed to fit it) and there aren’t many strapless patterns out there! I looked over my old blog post on the Esplanade (hooray for good record keeping) and made a few changes (sized down, took some volume out of the upper cup) and it was… fine. It pretty much fit, it tacked to my chest but if I moved, it would slide. It felt like the whole thing had to come up about 2 inches, while I needed to lose about the same from the bottom. It was pretty much decoration – it fit me, but gave me absolutely no support. Which is a shame, because the Marlborough bra from OL is my absolute favourite. Ah well, not to worry, there’s still options, right?

How about cloning my What Katie Did Merry Widow
? Just the top part. Even though it’s not a perfect fit on me, I could adjust it. I’d seen it done by bloggers before and it really was much simpler that I expected. Basically you use pins to mark all the seam lines and then join the dots. Then add seam allowance of course. There’s a few tutorials getting around for it, like this one.
The result was ok, better than the Esplanade, but room for improvement. It’s not the black one pictured above, BTW. I didn’t take proper photos of the first one. Just phone ones so I could get some feedback from the ladies a FB bra making group (yes, they exist. Shut up). Anyway, the bra ladies suggested I straighten out the upper cup piece, rather than have it curved as I’d traced. Which makes so much sense, because all the upper cup pattern pieces in my bra patterns have a straight upper cup. OK. YES. Let’s go again.

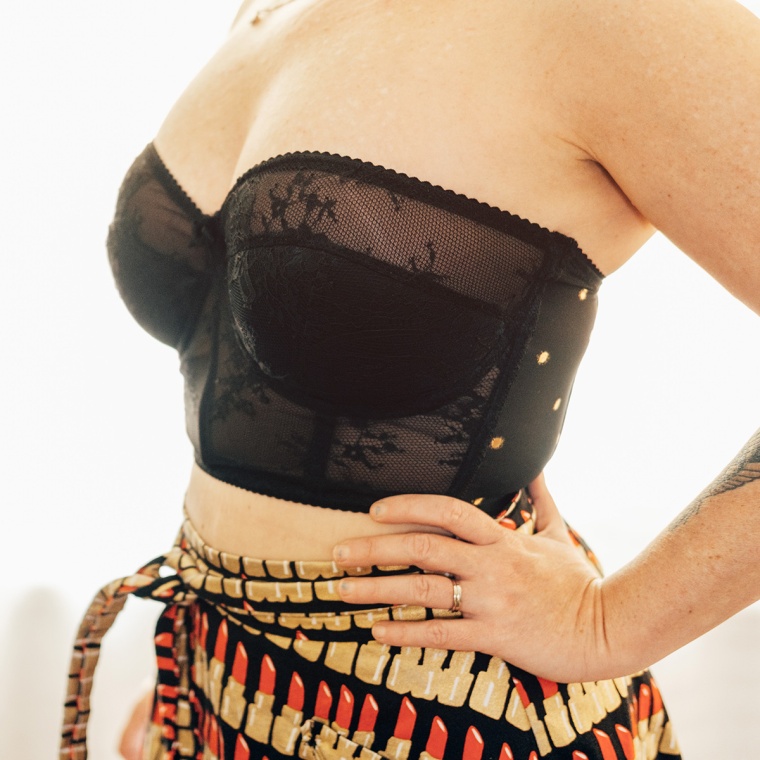
Which brings me to the black beauty. Holy heck. I did it. I DID IT. A strapless bra that fits. I ran downstairs to show my husband, who is pretty good at making all the right noises when I succeed (or fail) with sewing stuff. I could jump and that sucker won’t move. All is right with the world. I decided I wanted it a wee bit narrower in the bridge plus a touch higher in the upper cup, just for a smidge more coverage. A wardrobe malfunction after leaning down in a mesh dress wouldn’t be ideal.


Onto the final version! With bra sewing, a tiny adjustment really does make a bit difference, as does a change in fabric and definitely in power mesh. So, my final version ended up a bit different to the black version. But the wedding was looming and I was ready to put this thing to bed. It had been going on for a very long time.
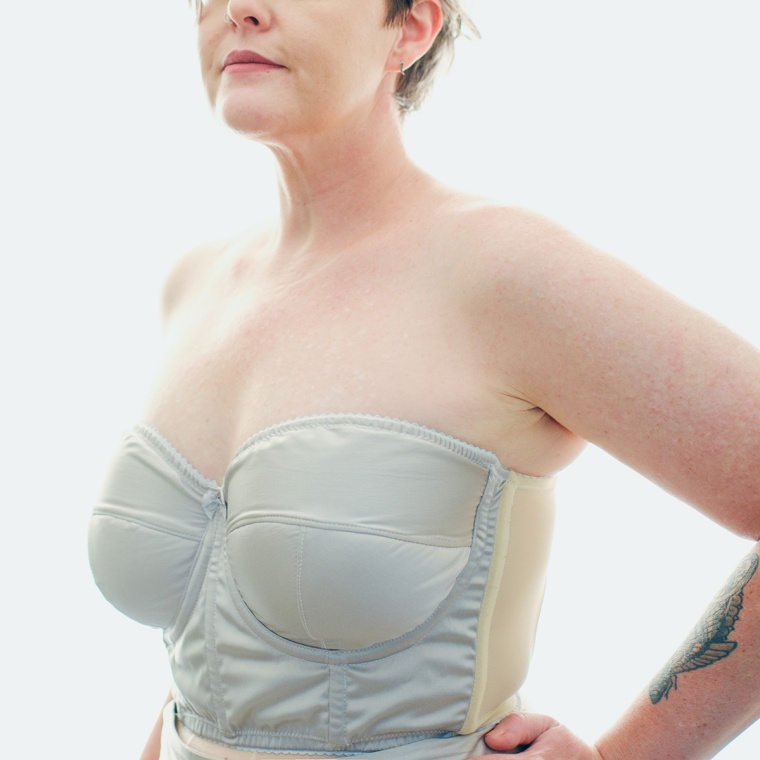
It ended up a bit too high in the cups and bigger in general all over, with some wrinkling due to the pretty unforgivable nature of the fabric. Not ideal, but I could live with it. In my head, I’d dreamed of matching my power mesh to the fabric, but finding it in silver proved very difficult. And the black mesh I’d used for the earlier version was much firmer than the nude, so I probably should have used two layer of the nude for extra strength. We live and learn.


The wedding was awesome, everything I was wearing stayed put, was comfortable and I didn’t think about it all day. I took these images a few days before, because I knew there wouldn’t be many of me on the day (part of being the photographer). I was right too, these are the only ones that exist and that’s only because my brother (the groom!) offered to take them, bless him.


The newlyweds ❤ I love them very much.


Oh wow! Well done you 🙂 you look amazing, the combo of the silver with the pinky stuff is really cool. Love the bras too
LikeLiked by 1 person
Thank you! Yes, I thought it was a nice combo 🙂
LikeLike
Awesome effort and outcome! also, I love the pics that your brother took ;o)
LikeLiked by 1 person
He’s an excellent brother 😀
LikeLike
You’ve been busy! No wonder you haven’t posted for a while (I’ve missed your posts).
Excellent job you’ve done with the dress – I’m very impressed with your strapless bra making skills, no mean feat.
LikeLiked by 1 person
It’s been crazy! Hopefully slowing down a bit now so I can blog a bit more. Thank you, I’m so glad I managed to finally conquer it.
LikeLike
This is gorgeous! How many panels did it take for this dress?
LikeLike
Thank you! I bought 2 panels and I’ve got a bit leftover.
LikeLike
I LOVE the overlay fabric that you chose. The contrasting colors in stunning.
LikeLike
Wow, I only saw this now, what an amazing project (well, projects is probably more fitting)!! Tip of the hat to you.
LikeLike