
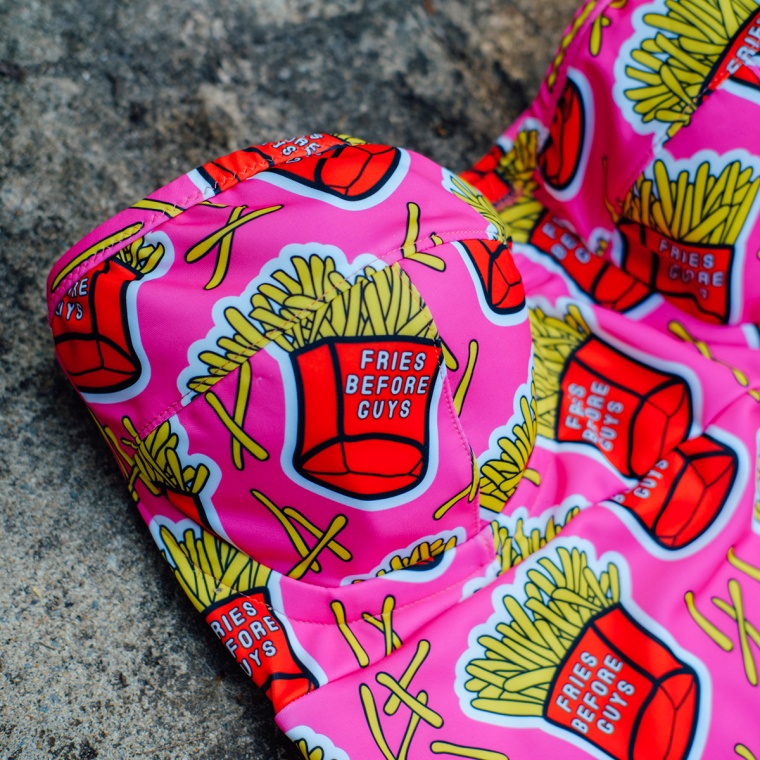
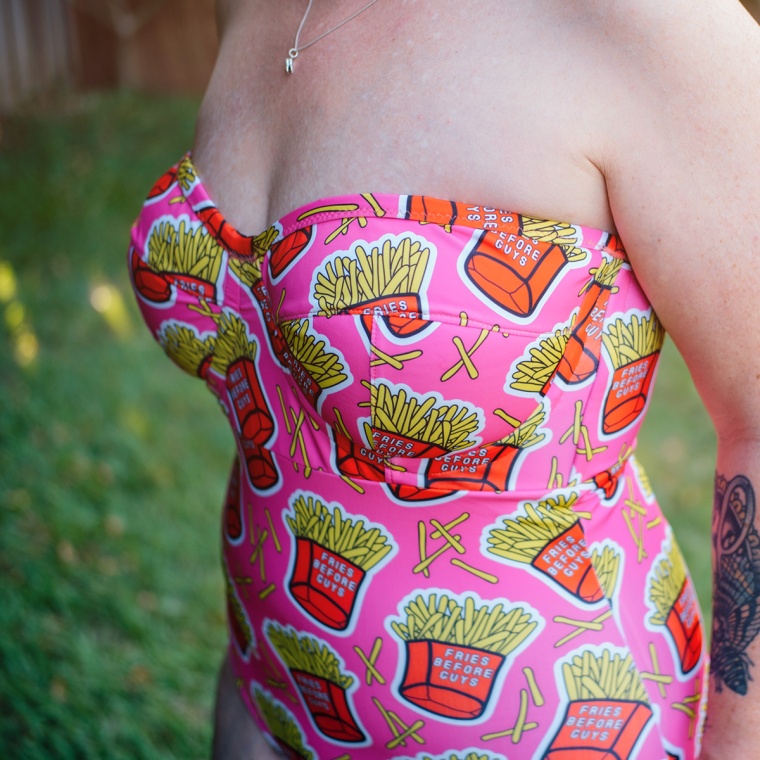
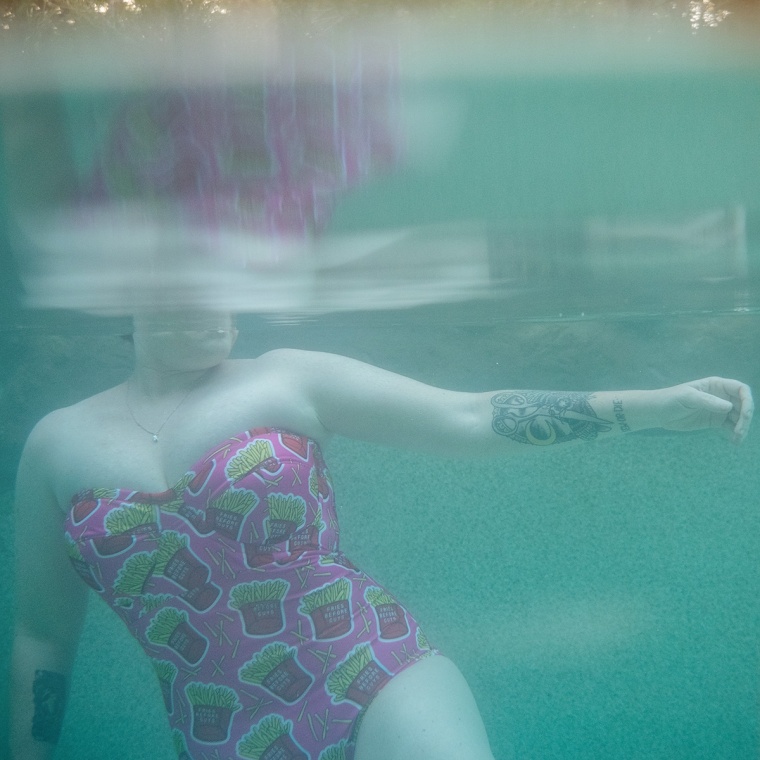
 Look, I’m a bit of a fraud because my body tends to reject chips (fries, chips to us here in Australia), even though I love their crispy, carby, salty goodness. Most of the time my skin is like ‘nah, we aren’t about those anymore. Have some acne for your attempt, though’. Who could resist this print though? It’s a bloody winner.
I know you want to know where the fabric is from and what the pattern is, but you’re going to hate me for it. The fabric (which is swim) was a pre order from Indie Skye fabrics and I don’t tend to go for pre orders because I’m damn impatient and hate waiting longer for my fabric than is entirely necessary. But I decided this fabric was worth waiting for. The lining is lightweight swim spandex from The Remnant Warehouse because it has a bit more body than regular old swim lining. And it’s nicer to sew.
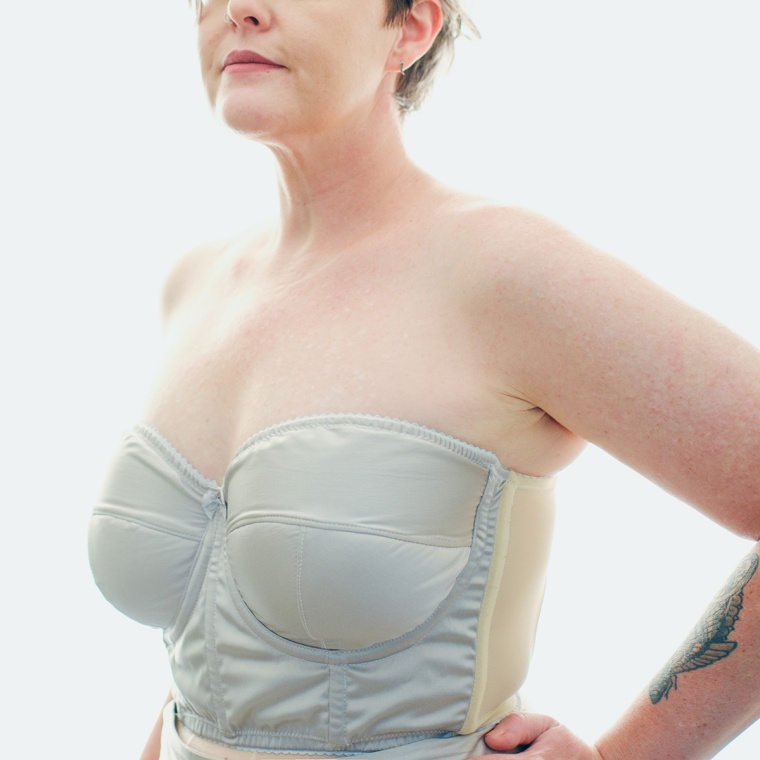
What else? Well there’s some foam (complete with my markings still, please ignore. But it is good to mark all the points on your cups so you don’t sew them around the wrong way, they look very similar) from Sew Squirrel, underwire casing, underwires, swim elastic (all from The Remnant Warehouse also, from memory) and some sheer cup lining for the upper cups and bridge (pretty much because I wanted those pieces to stay stable and maintain their shape). Also there’s some boning in the side seams of the bra portion, which is just cable ties cut down.

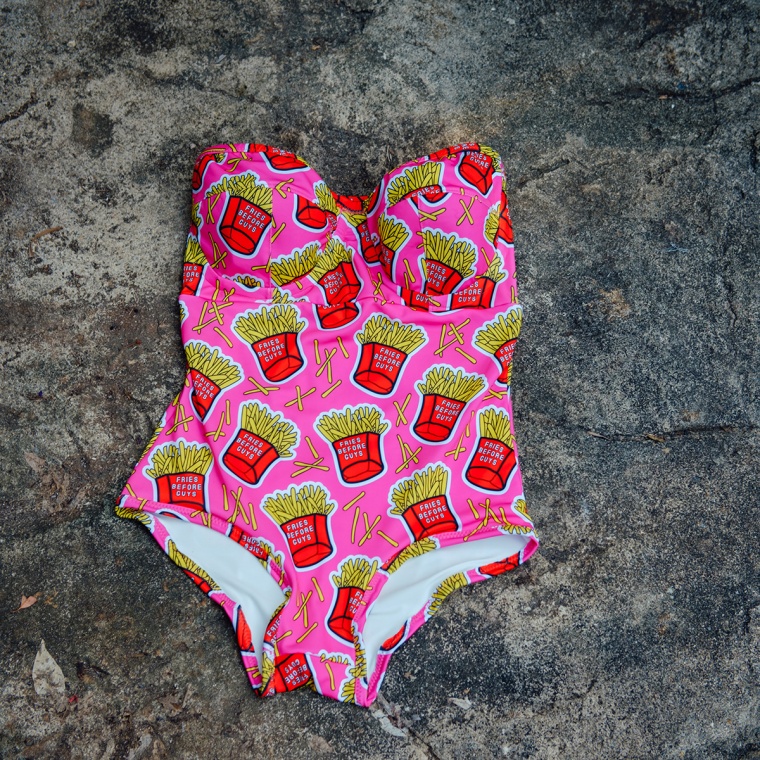
Pattern, well bear with me for that one. The lower portion is Megan Nielsen’s Rowan bodysuit. If you’ve read posts on my one pieces before, you’ll know I’ve used this many, many times. I like the fit. Obviously I line it, eliminate the crotch snap part of it and bind or band the legs, but you could use swim elastic and fold over too. I have big legs, I don’t really need the elastic to pull everything in. I just use good old zig zag because I don’t have a coverstitch machine, I hate twin needling and even though it’s very Becky Home Ecky, if someone on the beach is judging my zig zag, that’s their problem. Because they’d have to be in my lap to see it and that would be weird. You know they aren’t though, just as they aren’t judging my body. But more on that later.

So, the bra part. I know, it’s a bit of sorcery and I wasn’t even sure that it would work. In fact, I was almost positive that it wouldn’t and I’d try it on and have cups folding over and boobs heading towards their old friend, my belly button. I figured I could add straps at the end if I wanted to, but I also wanted to just see if it would work. FOR SCIENCE. You know I love bra sewing though. I love the challenge of it, I love the precision, I’ve even grown to love the little 1/4″ seams. I love watching cups go from flat to boob shaped with foam and wire, I love making the finish really lovely and enclosing the seams. It’s just my happy place. You know?
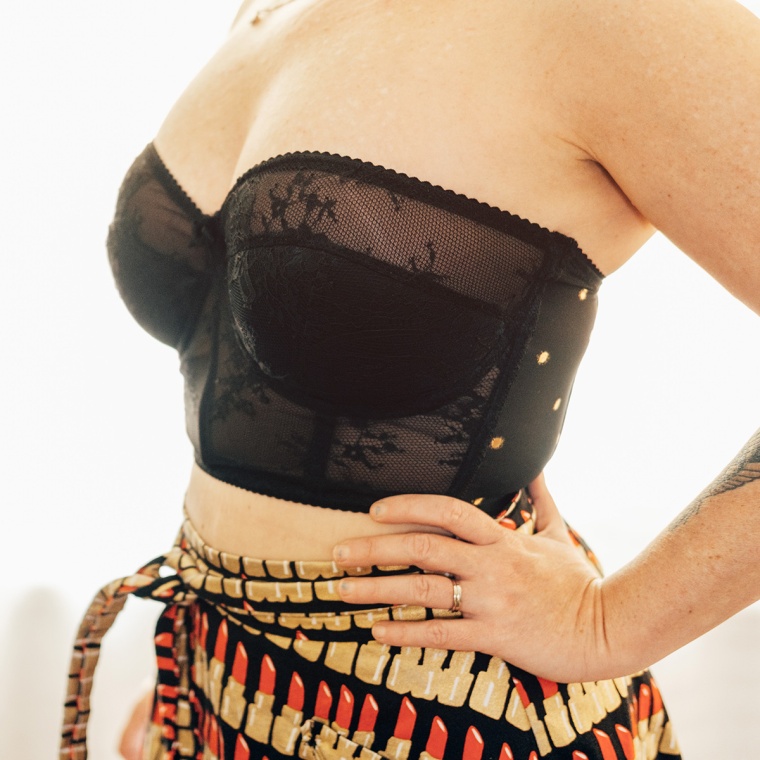
If you’ve been following along lately, you’ll recall my strapless bra journey. The new guy is the same pattern, shortened, with a bit taken off the upper cup (because it was too high and also to compensate for not folding over with the picot) and boning left out of everywhere except the side seams. On that note, I think the boning is part of the engineering magic. It stops it from wanting to roll down with the weight of my bust. Also, those extra long wires help for the same reason. The keep it tacked to my chest and in place under the arms.

Here are some technical construction and fit notes you can scroll past if you want:
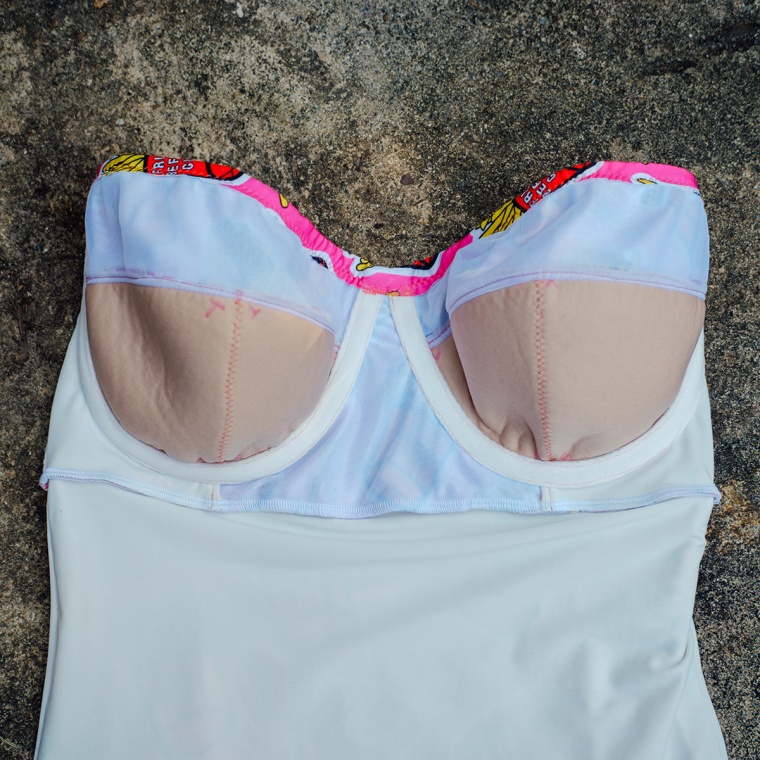
– Stabilising the bridge with bra lining (which is strong but super light) stops it from stretching out and distorting the cups shape. But it also makes the whole thing a bit harder to get into. Next time it might be wiser to add some sort of closure – either a zipper down the front or some kind of clip at the back. I do like the comfort of not having any closures though.
– To make sure the bra part would fit on the body part, I just lined up the pattern pieces. They were super close and I didn’t need to change a thing. I cut the back band piece of the fold and there’s no hook and eye like on the bra versions. This made it a bit smaller across the back, but the fabric has a bit more stretch than the traditional power mesh band of the bra version, so they sort of cancelled each other out.
– I was very close to cutting the upper cup pieces out of swim lining, but realised my bra versions have no stretch there, which is really important – it needs to hug in close. If it stretched out, there might be some gaping and more risk of a wardrobe malfunction. So I used the very stable bra lining there too.
– Contrary to popular opinion (I see this all the time in sewing groups!), the foam is for support, not to enhance bust size. If the foam wasn’t there, the whole cup portion would drop. Same for sports bras, especially if there’s no wire. I often see people request sports bra patterns without wire OR foam, stating that they are already big and don’t need extra padding. But foam is great for support and is often necessary for bigger bust especially. Don’t fear the foam. I’ve used straight stitch to top stitch the cups (instead of zig zag) because they don’t really stretch and I don’t want them to. The foam has a tiny bit of give, but not much else. But you can totally use zig zag if you prefer the look.
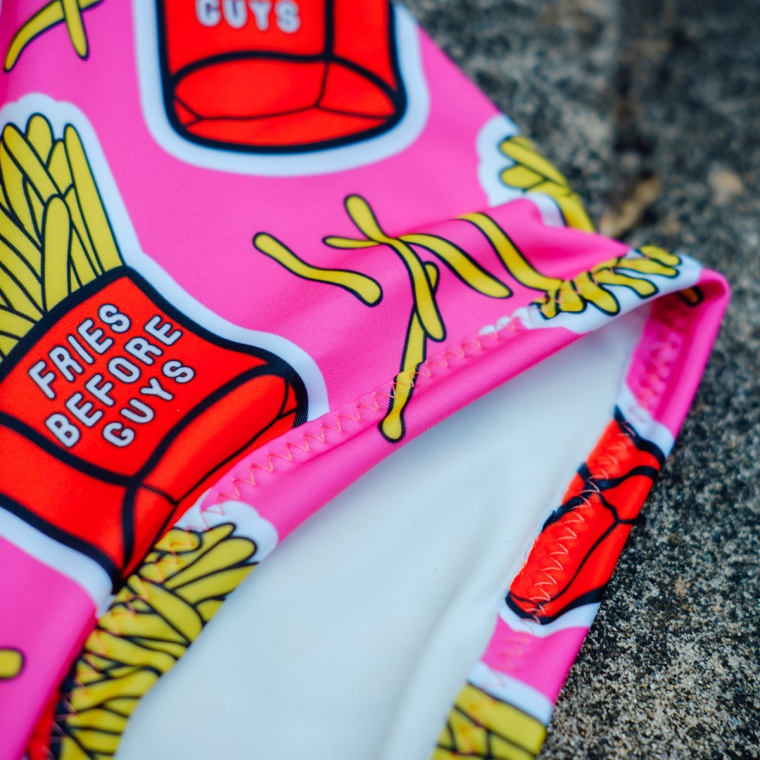
– The only other part that made me stop and think was how to finish the top of the cups. In my bra versions, I’ve used picot because I like the look and the finish. It’s a bit too ‘I’m a bra’ for swimmers for me though and using binding in matching fabric is usually the way I finish raw edges. Obviously in strapless swimmers, the top part really needs to stay put, so rather than just using strips of fabric as binding (which doesn’t need to be cut on the bias like woven, FYI), I used swim elastic in there too. Same method as usual, which is putting a bit of tension on it all the way around so it hugs towards the body. There’s a little mention of that method in my video here, but in relation to finishing the leg openings.
– I decided to run the binding all the way around the top edge, as opposed to finishing the bridge first without binding (ie sewing lining and outer fabric right sides together and flipping, which is how I generally do my bras) and finishing the upper cups before adding them into the frame for a couple of reasons. Firstly to minimise bulk. The binding plus elastic adds a fair bit of bulk, which in turn makes it harder to sew down the underwire casing at the underarm and bridge. Much easier to sew over everything at the end. Plus, I would have had to fiddle around with seam allowances at the upper cup – cut them down to counteract the fabric lost when folding over picot to make sure it lines up with the finished bridge. God I hope that makes sense. It’s really hard to explain. Anyway, much easier to cut the upper cups down as needed to line up with the bridge once they’re already sewn into the frame. Then bind the whole thing in one hit.

As usual, I’ve used far more words than I had planned. If you have any technical questions, just comment and I’ll try to answer. I’ve never had any proper bra training, but have learned so much from trial and error. And what is that sensible black skirt I’m wearing? Is it a skirt?
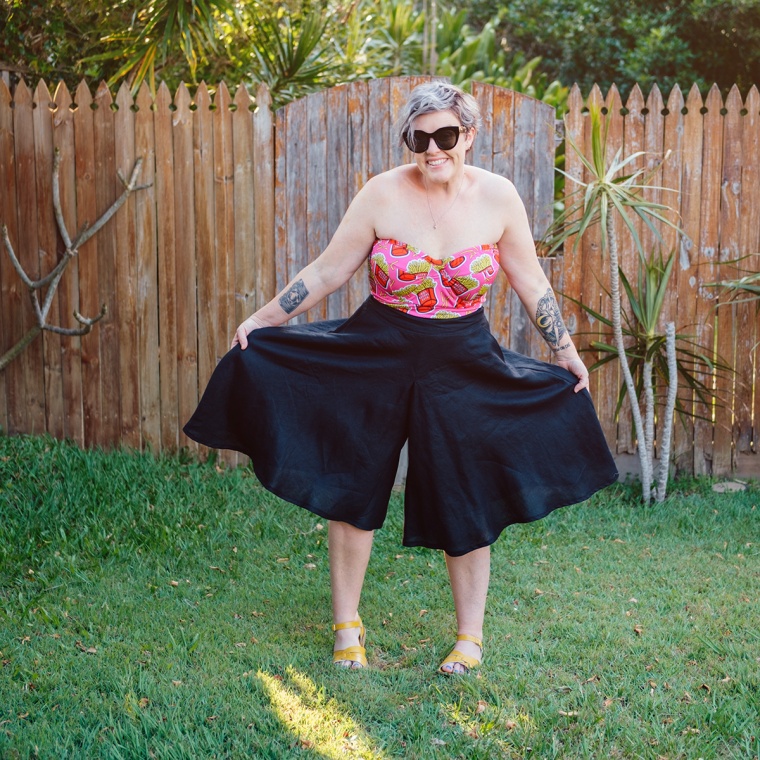
No! It’s the Tania culottes in linen from Potter and Co! Trickery! This is the updated version, which Megan so kindly sent me. Its now got pockets and extended sizes. Truly one of the most wearable things I own, especially for work. Photography work, that is. I’m often getting down on the floor and these make it much easier. The only change here is that I’ve used my own curved waistband, because as I’ve mentioned many times in the past – rectangle waistbands don’t work on this short waisted, curvy body. There’s too much of a difference between my hip and waist measurement and I get gaping in the front and back. Imagine pinching a dart out of the top of the front and back waistband pieces – that’s the shape I need.

So, back to the swimmers. I’ve tested these babies in the pool and they passed with flying colours. The real test will be in the surf. But I can still add straps if required, probably removable ones so I have options. I really like how these have turned out.
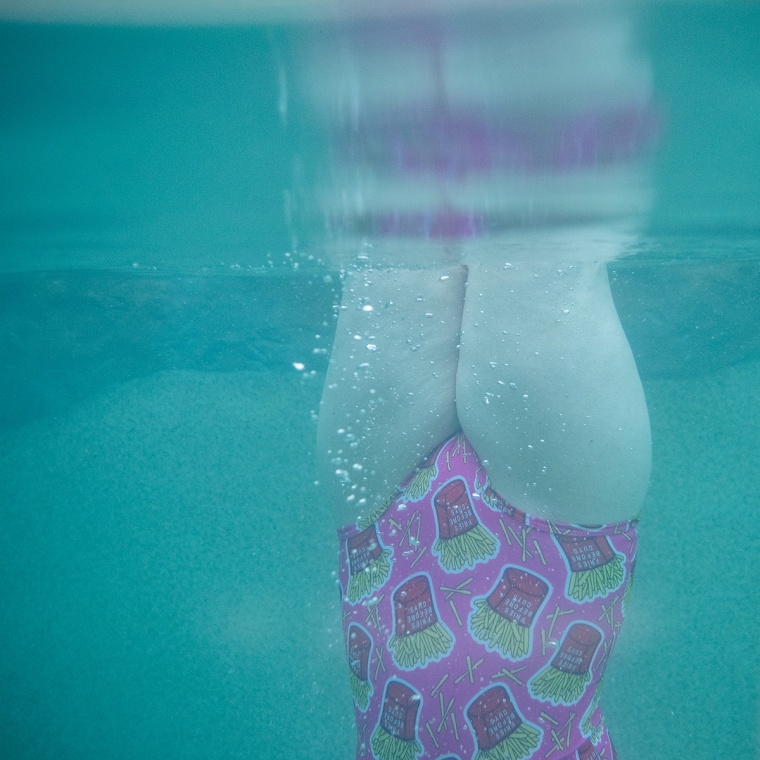
If you’re anything like me, you might have some of those pesky voices in your head – you know the ones, they like to say mean things and make you feel crappy about putting on your swimmers and enjoying yourself at the beach or the pool. Mostly I can shut them up, but there were a couple of persistent ones when making these. The first being that strapless things are for smaller bodies, particularly slender arms and backs. The other one was the fabric. Weirdly, I have had issues about wearing food prints before. I know it’s ridiculous, but I felt like I was saying ‘hey! look at me wearing food that contributes to this fat body!’. So with this fabric screaming its fries-positive message, all I could think of was people would look at me and think, ‘well, obviously true for her’. I know how crazy that sounds. And I’m wearing them anyway, because I made them and I’m proud and I love how fun the print is. So there, voices. You can shut up now.

Wow! The fit you’ve achieved with these swimmers is amazing! Anybody thinking anything else about your accomplishment is a poor fool who’s missing out on loving a work of art! Pity the fool!
LikeLike
Haha. Pity the fool! Thank you x
LikeLike
Basically the best swimming costume I’ve ever seen. Just wanted to say thanks for the informative posts you do too. Really help those of us that dream of making bras/ swimming stuff but also fear the process!
Ps. I’d love to wear a print like that! Is fantastic.
LikeLike
Thank you so much Heather! I like sharing so it helps other people, but it’s also really good for my own records. LOL. I often go back through when I want to remember how I did something.
LikeLike
I just love this print as a swimsuit! SO COOL!!! And I always love all your sewing notes too as they give me ideas on how to tackle certain things so I never mind your longer posts at all.
LikeLike
Yay! I’m so glad x
LikeLike
I’m planning on making the culottes and using my favorite curved skirt waistband for it! I love yours!
LikeLike
Curved waistbands are absolutely the way to go, I think!
LikeLike