Quilt It {Simplicity 8298}

webDSCF9876

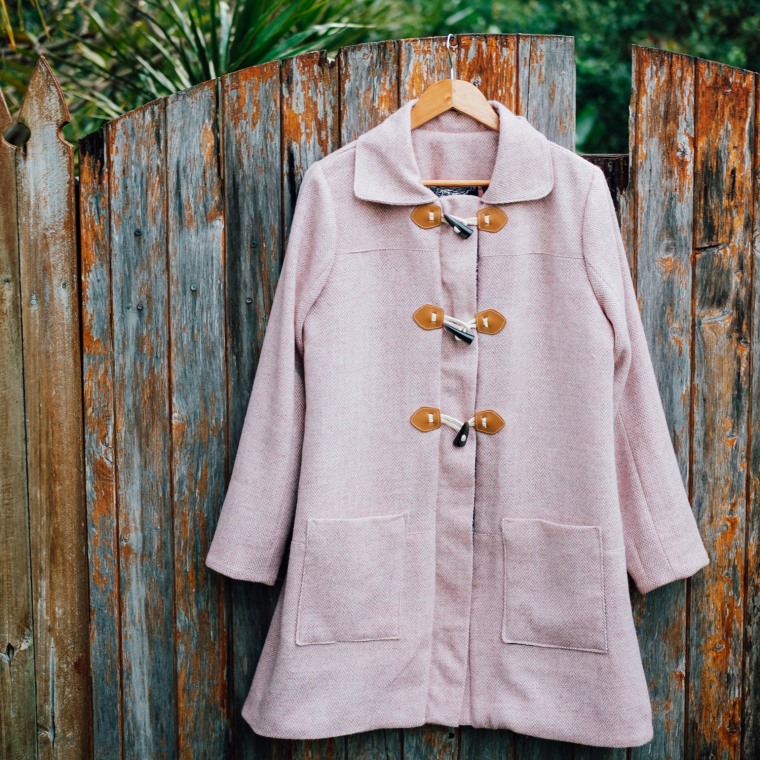
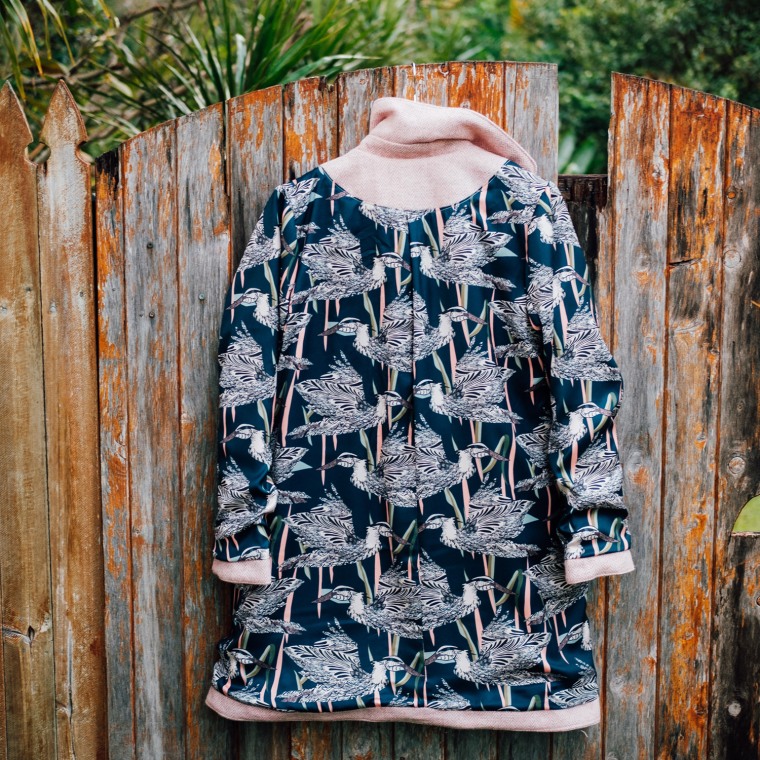
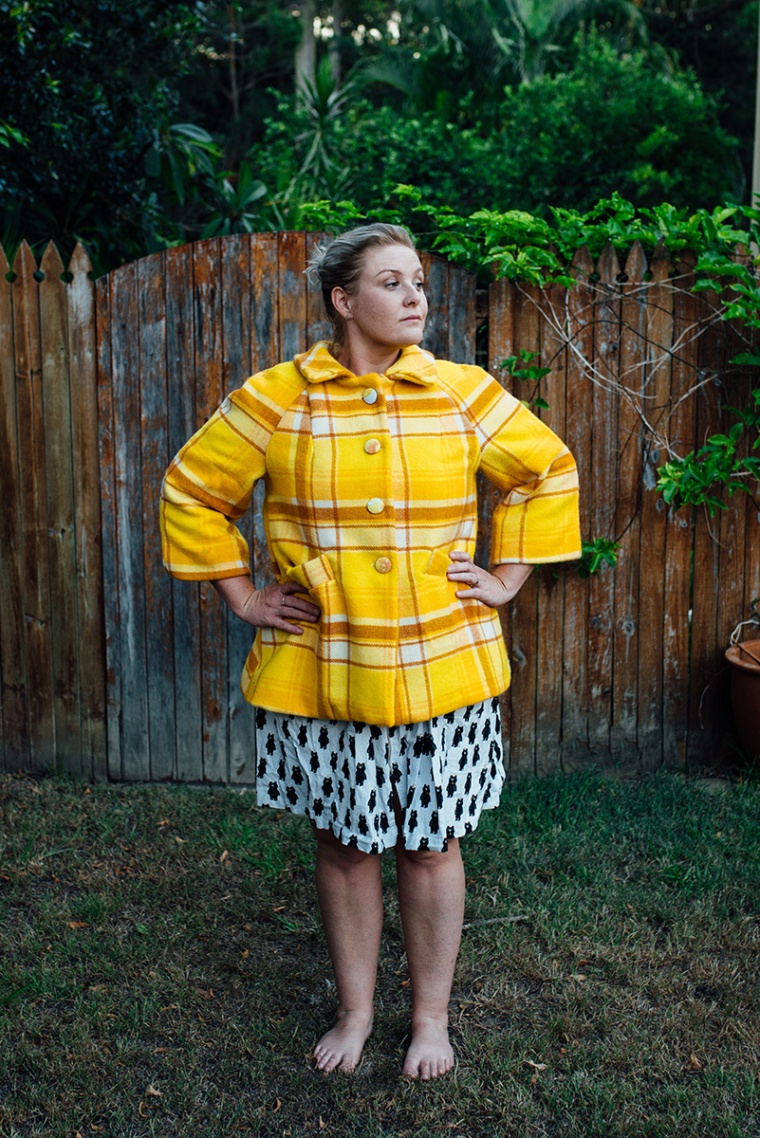
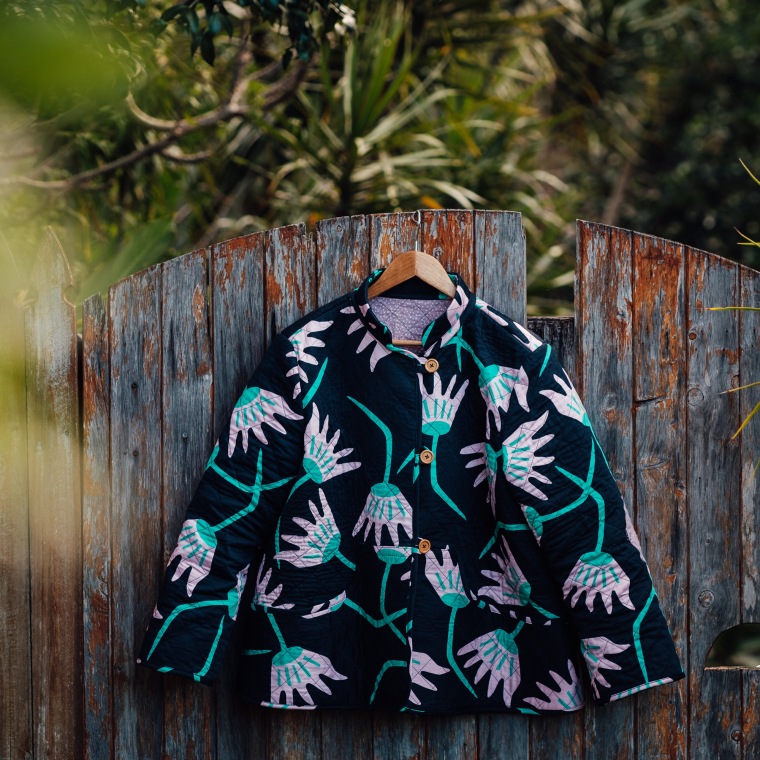
I am not a quilter and this is definitely my first rodeo. Simplicity 8298 is one of those cute Dottie Angel patterns with the cover images that suck you in, so you think that you too could be that kind of effortlessly adorable. You know – tights, smocky dresses, Mary Janes and long blonde hair twisted onto your head in braids like some kind of perfectly skinned, milkmaidy beauty.

webDSCF9872

webDSCF9873

Just me? Ok. Well, the pattern calls for already quilted fabric and is a bit lightweight with the instructions. Of course, I couldn’t find suitable fabric (hello, polyesterworld) and had to quilt my own. OF COURSE. I turned to my trusty FB sewing group and asked their advice and here were the tips that I used:

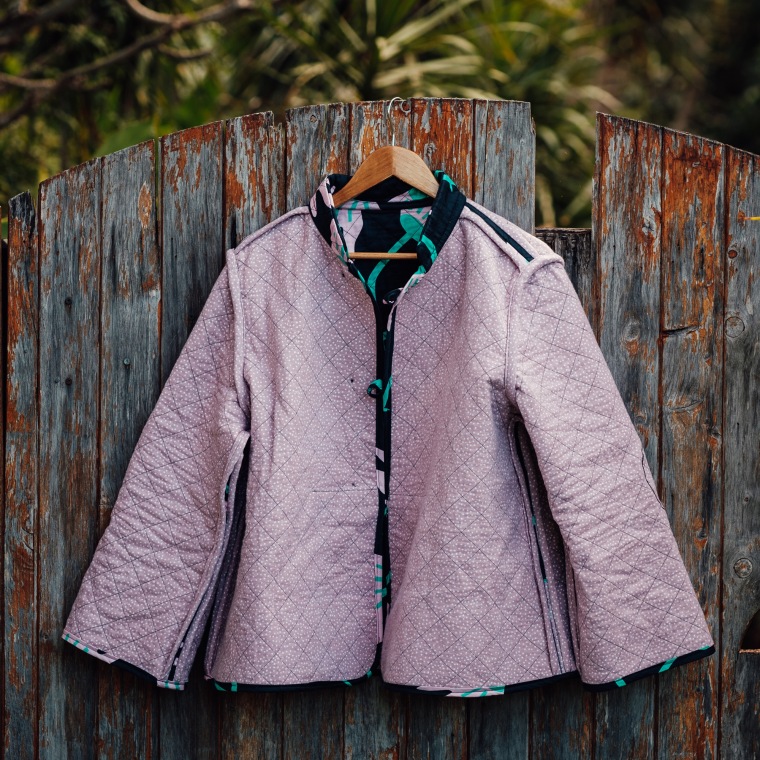
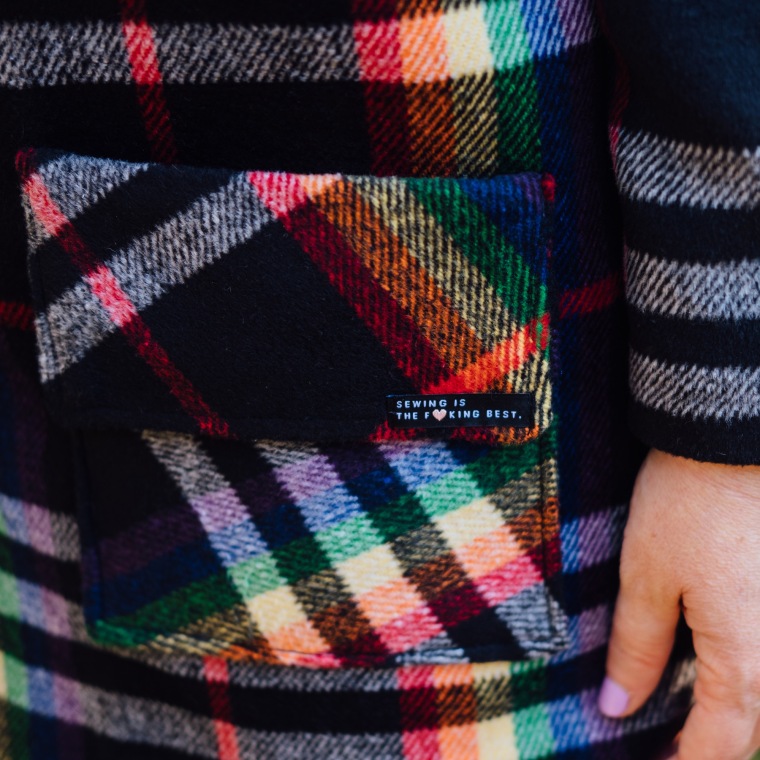
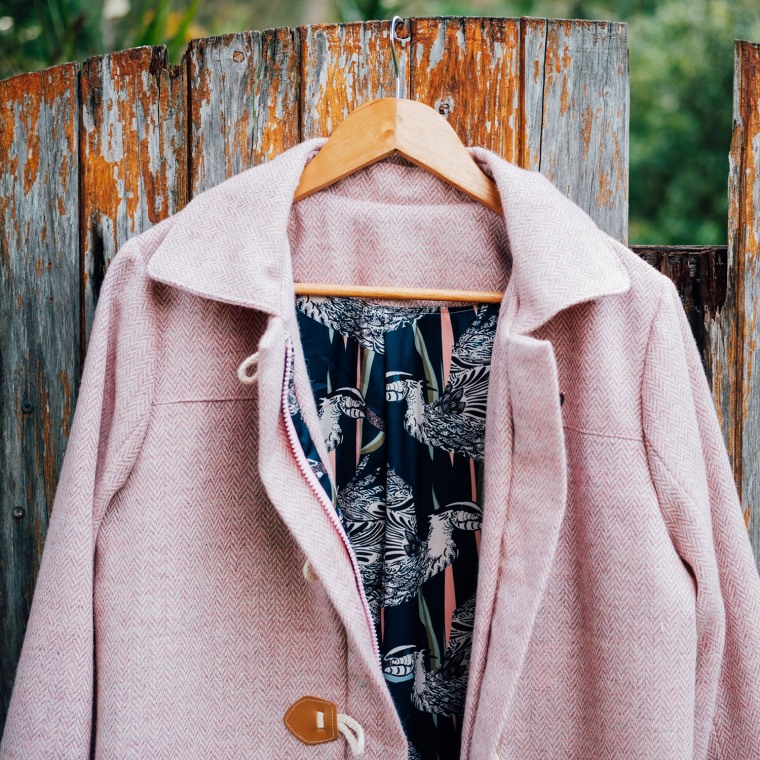
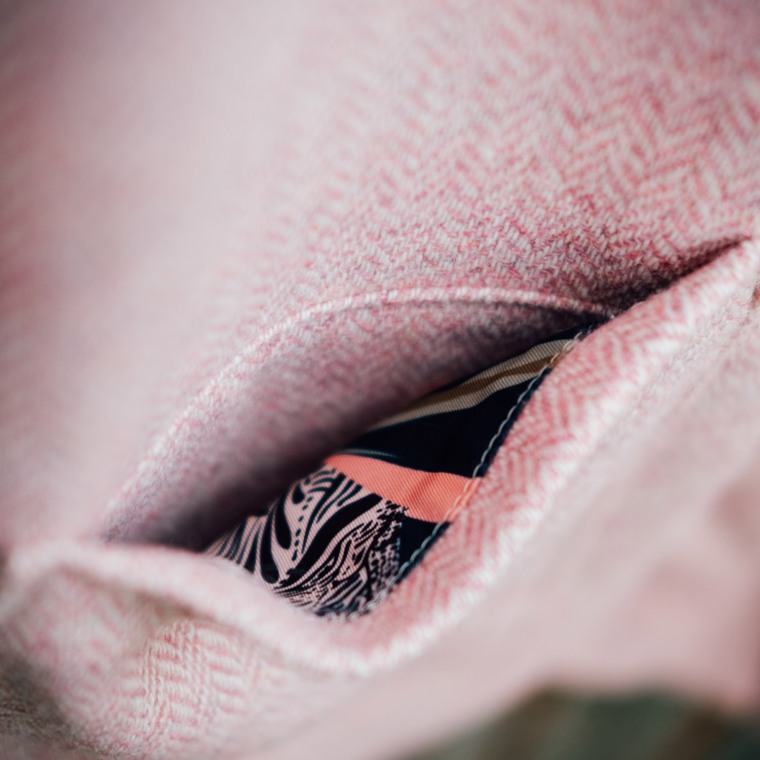
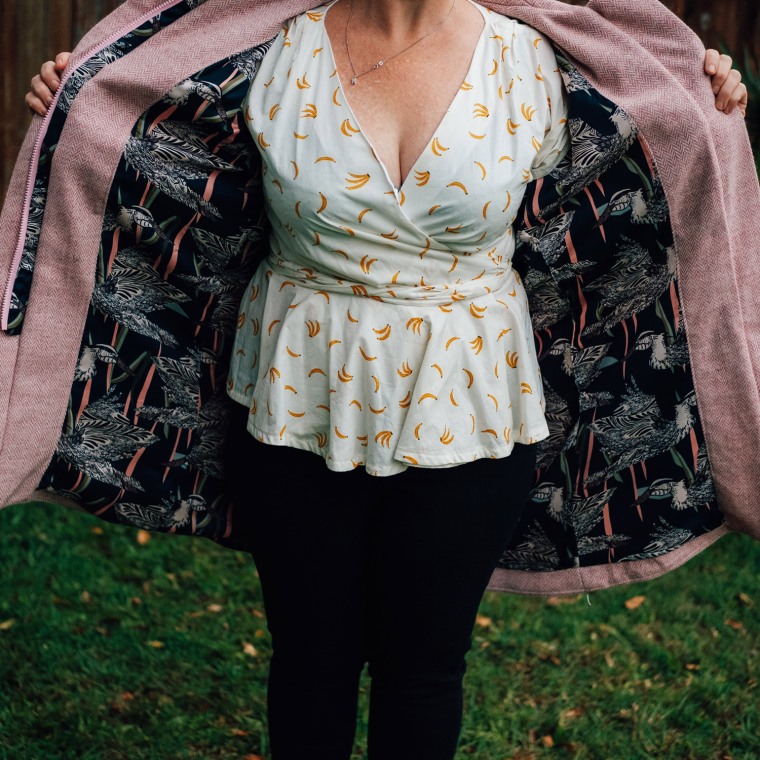
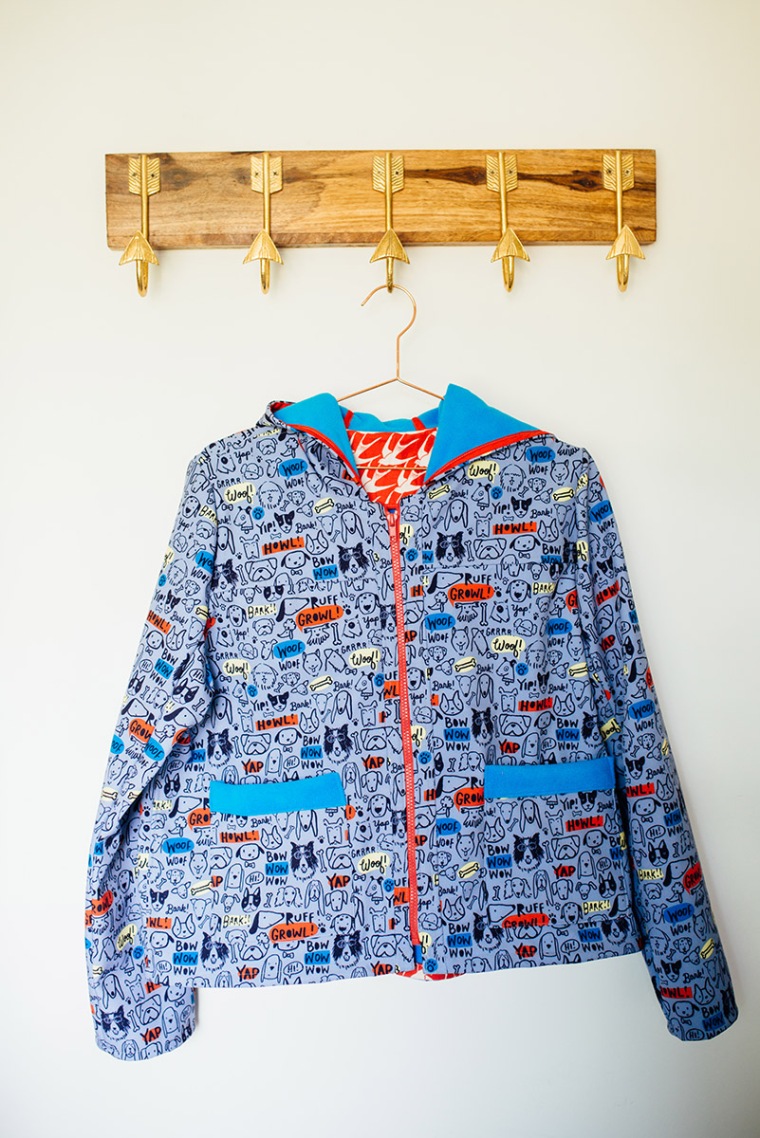
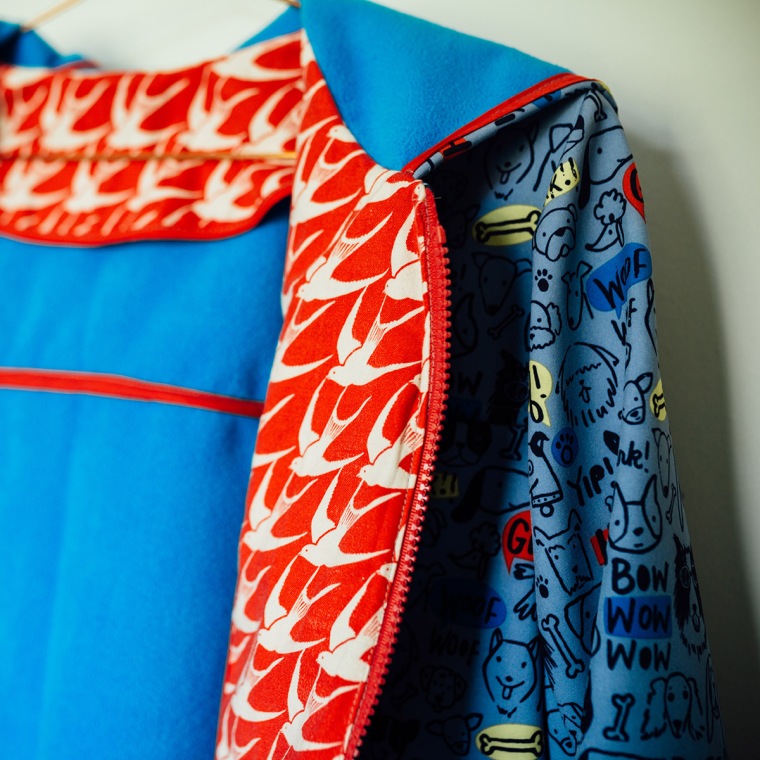
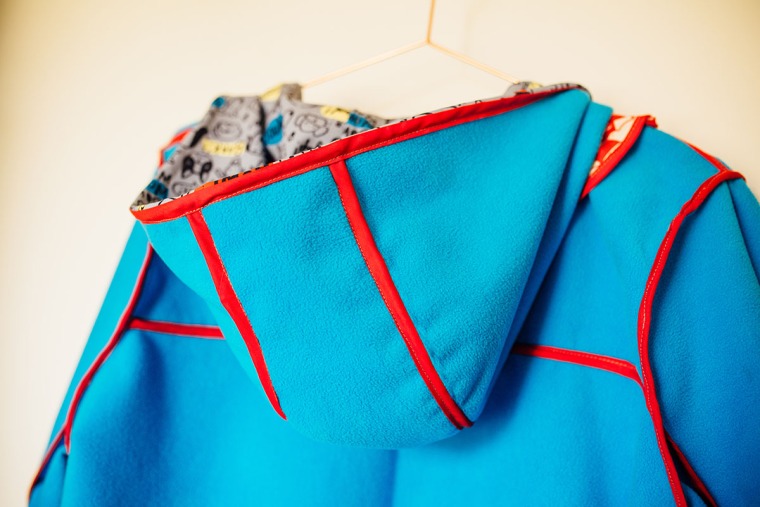
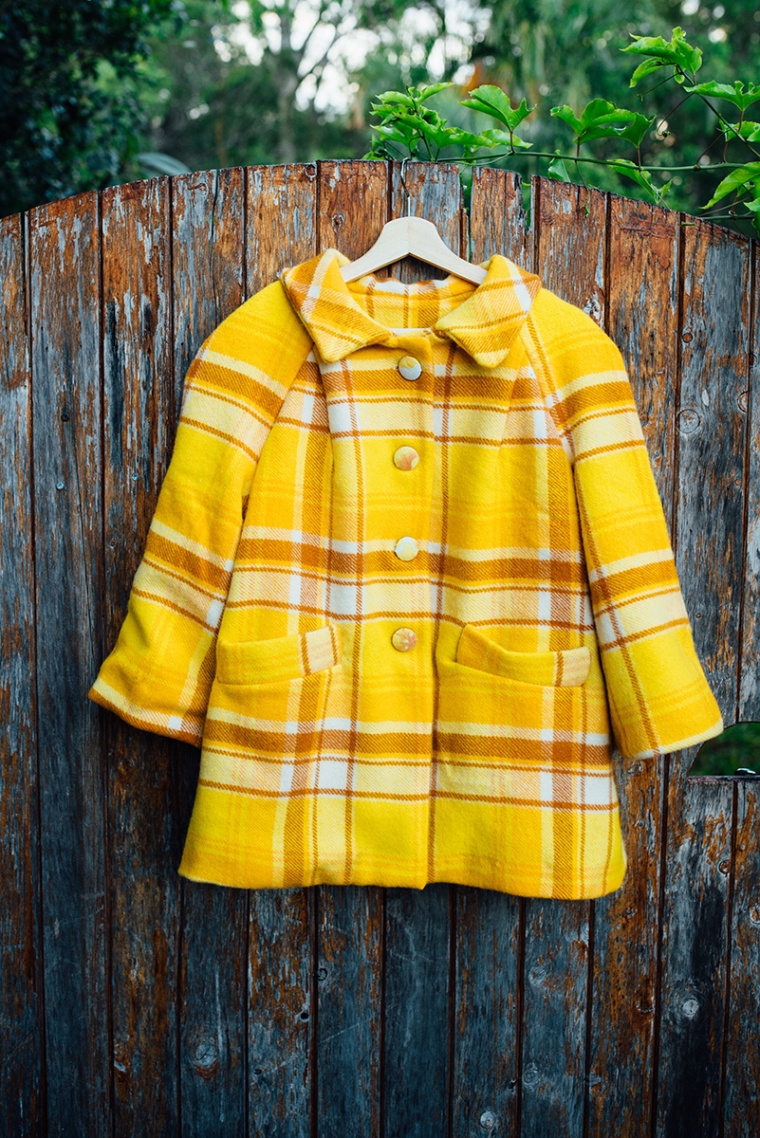
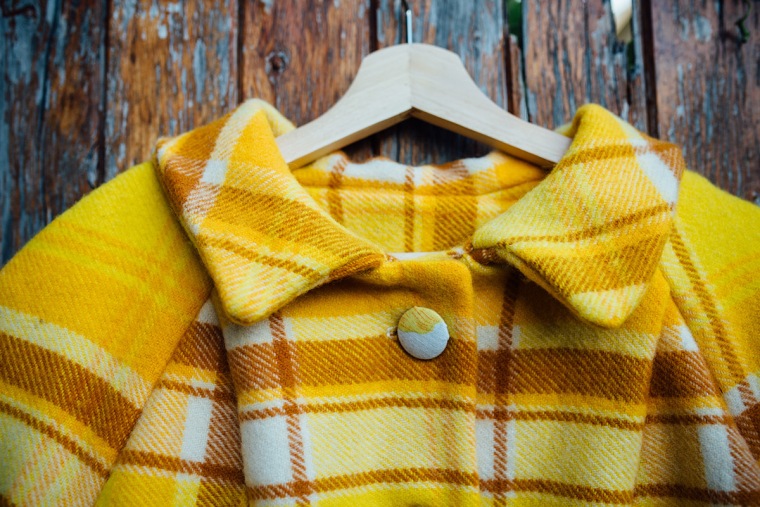
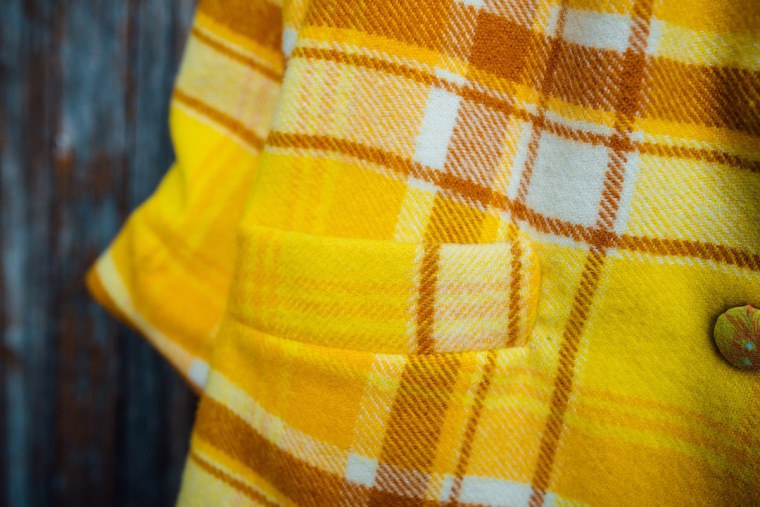
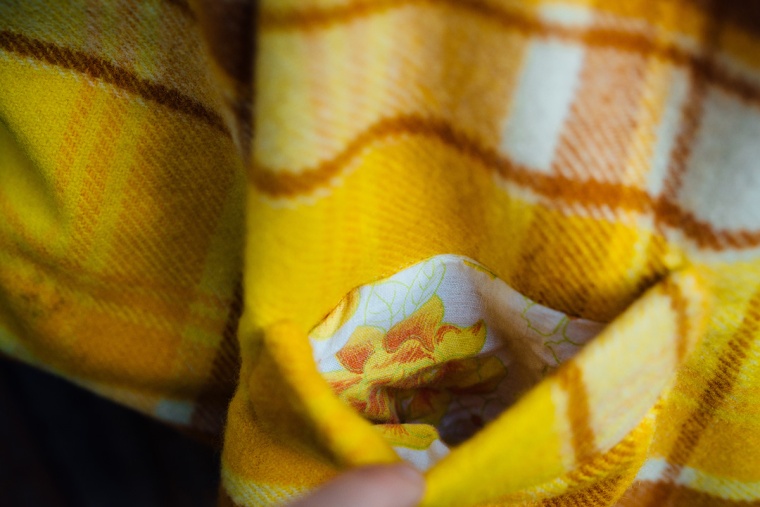
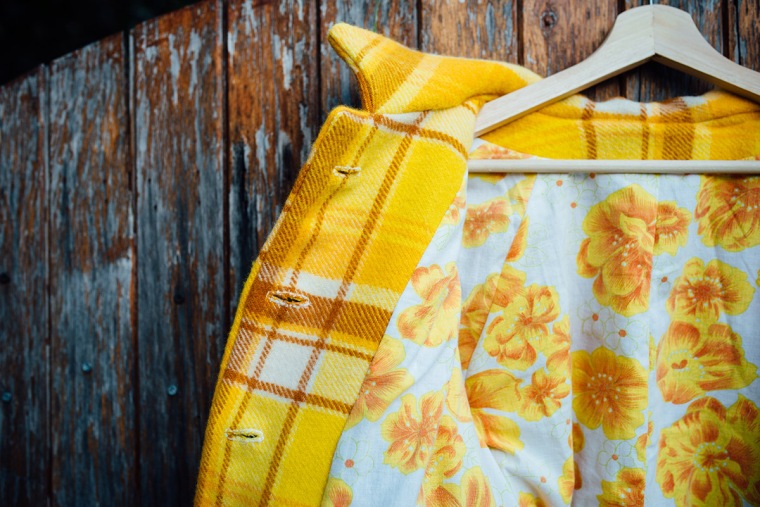
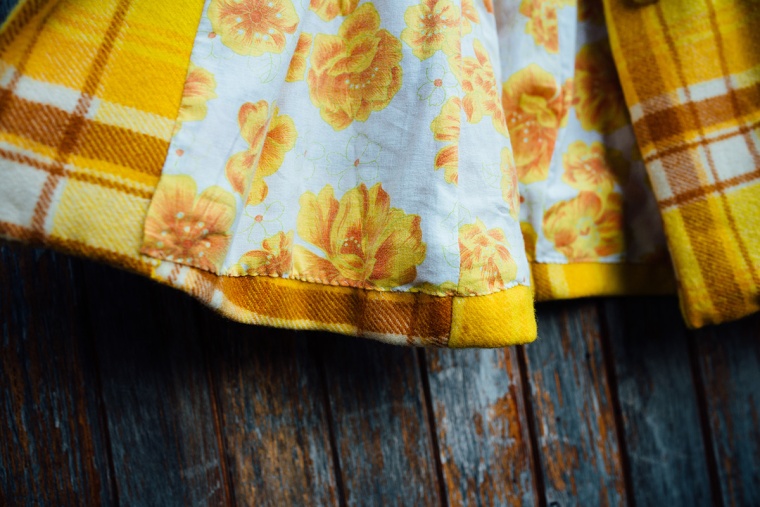
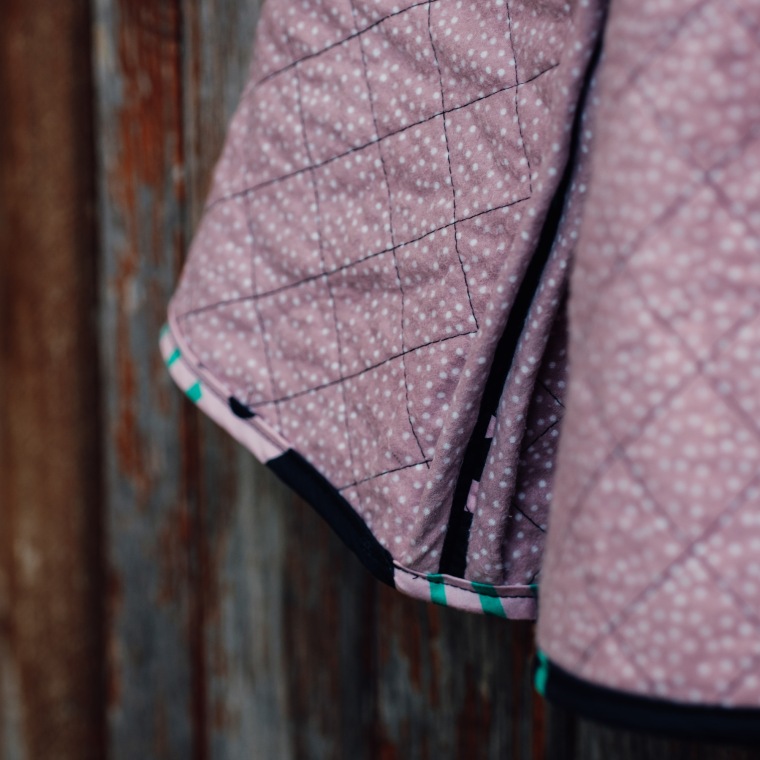
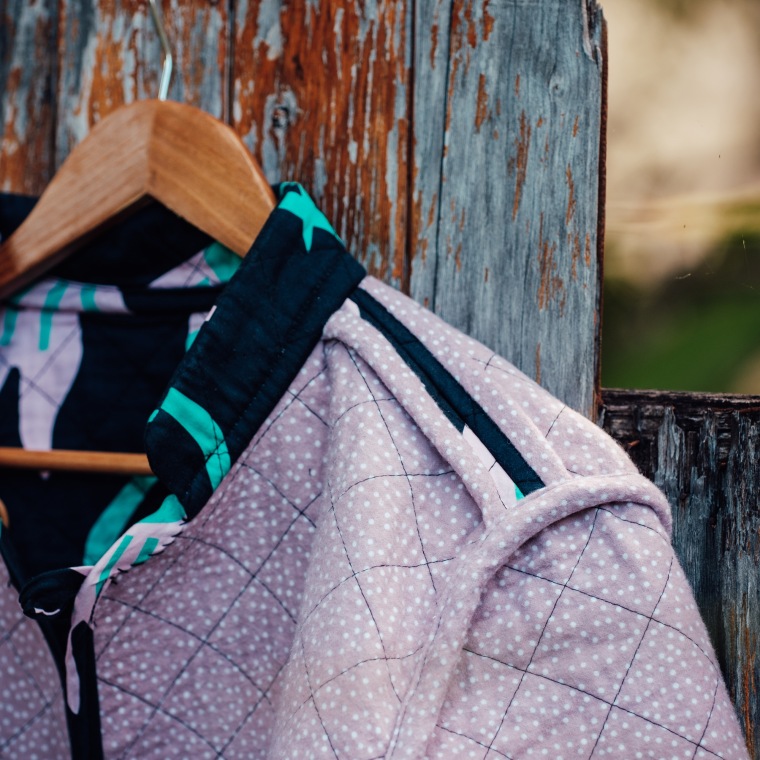
– Flannelette instead of wadding. Not as heavy for our mild winters and 100% cotton. I used two layers, one pink and spotty, one plain cream – both from Spotlight. The outer fabric is cotton sateen from Nerida Hansen.

– Basting spray. Now I must admit, as I was using this I had my doubts. It was like beginning of school year contacting books all over again, but I got there. Do recommend.

– Instead of chalking all those lines (which yes, I had intended on doing), just mark two and then use the metal wire  foot attachment thing that comes with your sewing machine to guide you through the rest. Genius. Seriously.

– Quilting can shrink your fabric slightly. I cut my pieces out roughly a couple of cms bigger, quilted each piece and then cut them to size. Fiddly, but doable. Saves you from quilting an epic piece of fabric. I had enough trouble getting the back piece done.

– And here’s a tip that might be obvious to everyone except me: when quilting the larger pattern pieces, the sheer size of them can by difficult to deal with under a regular machine. I rolled mine into burritos on the side I wasn’t quilting, so they fit through the throat space of the machine.

webDSCF9875

webDSCF9881

Other things to note are:

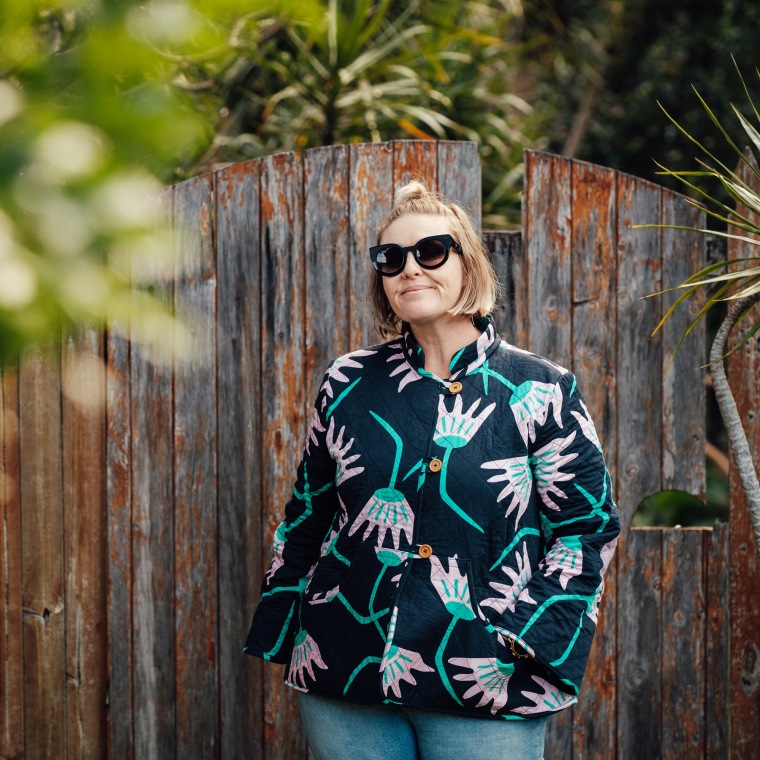
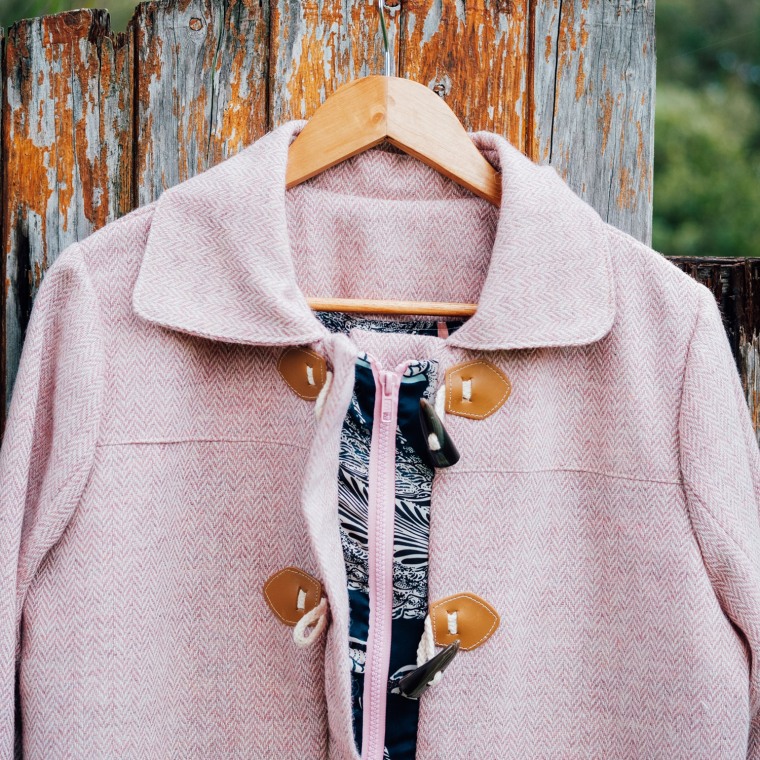
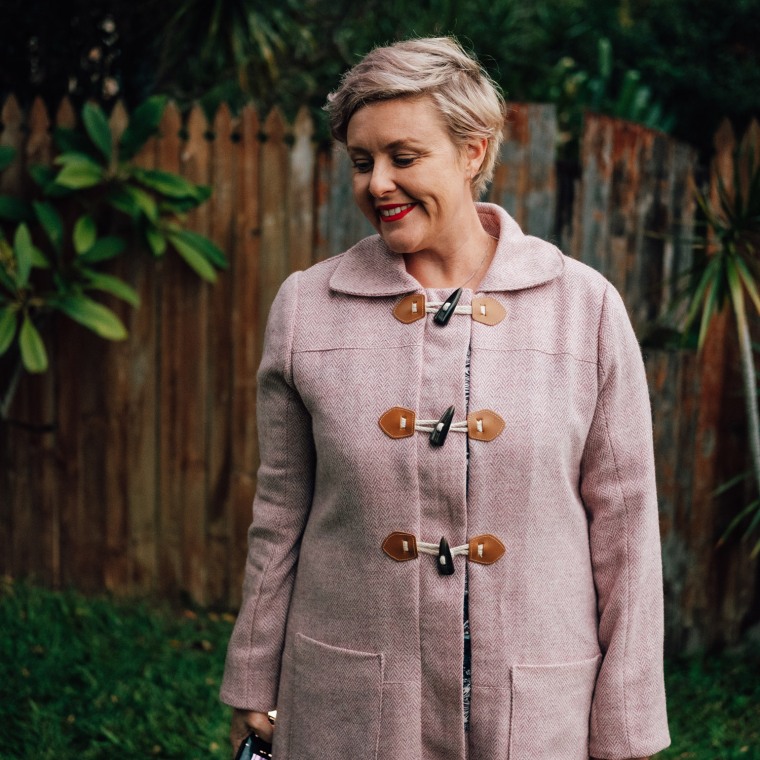
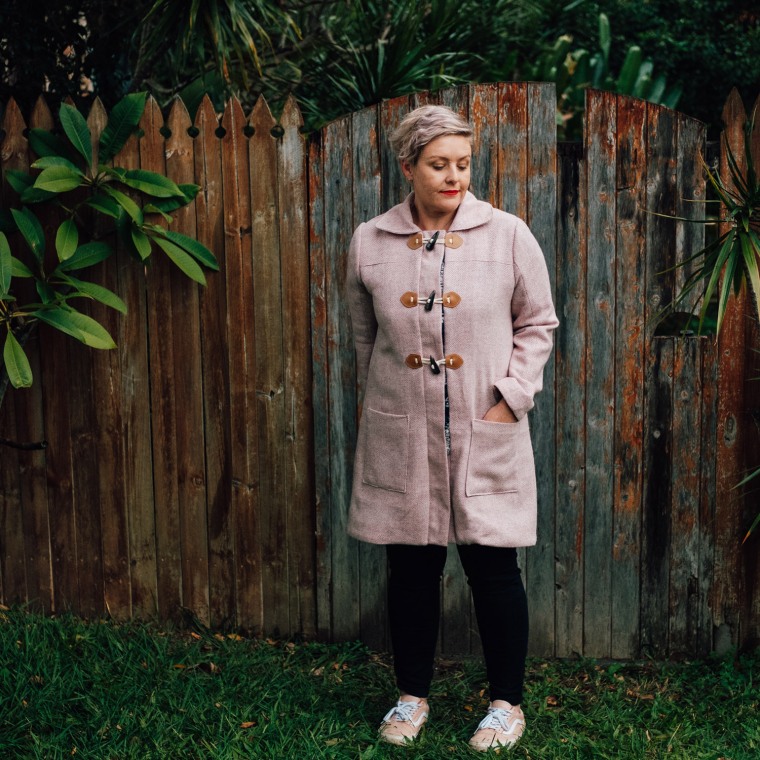
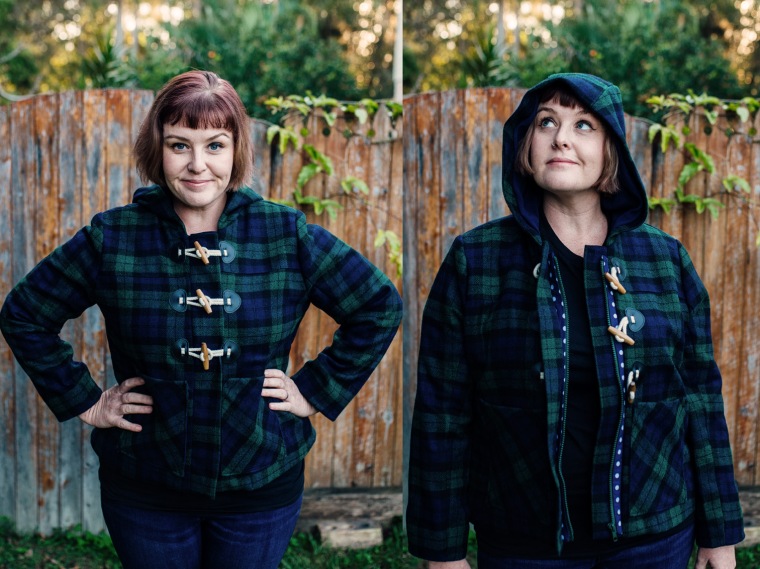
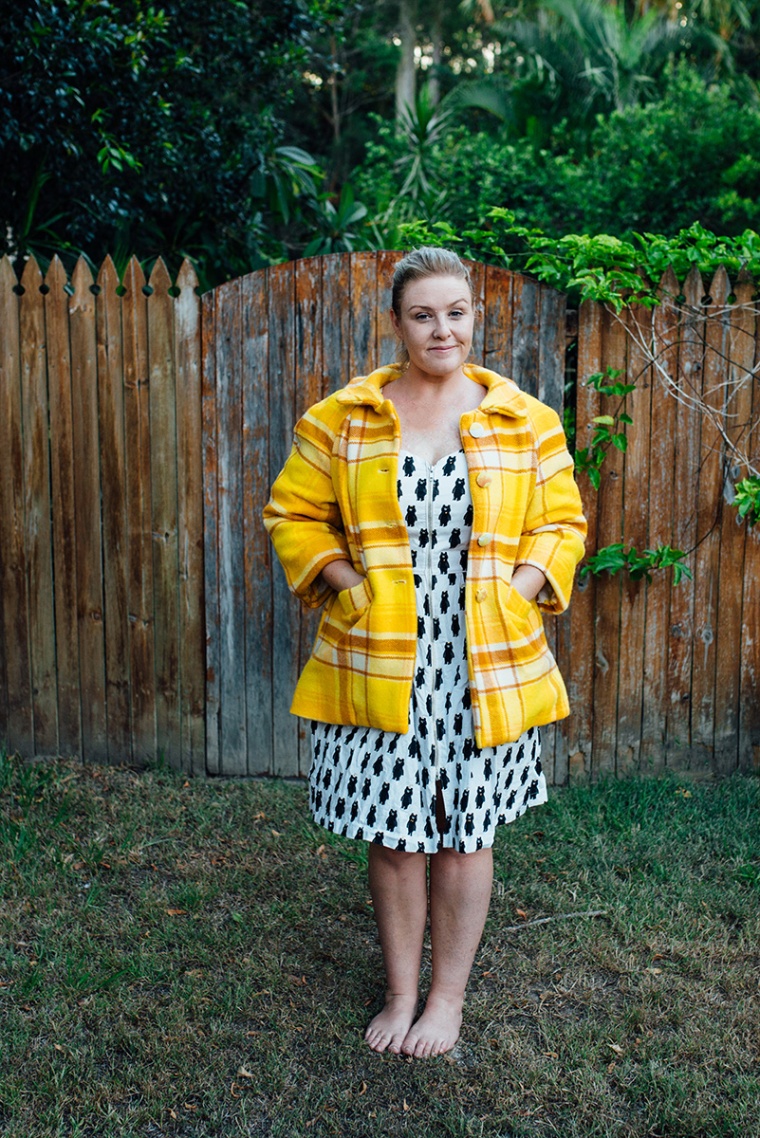
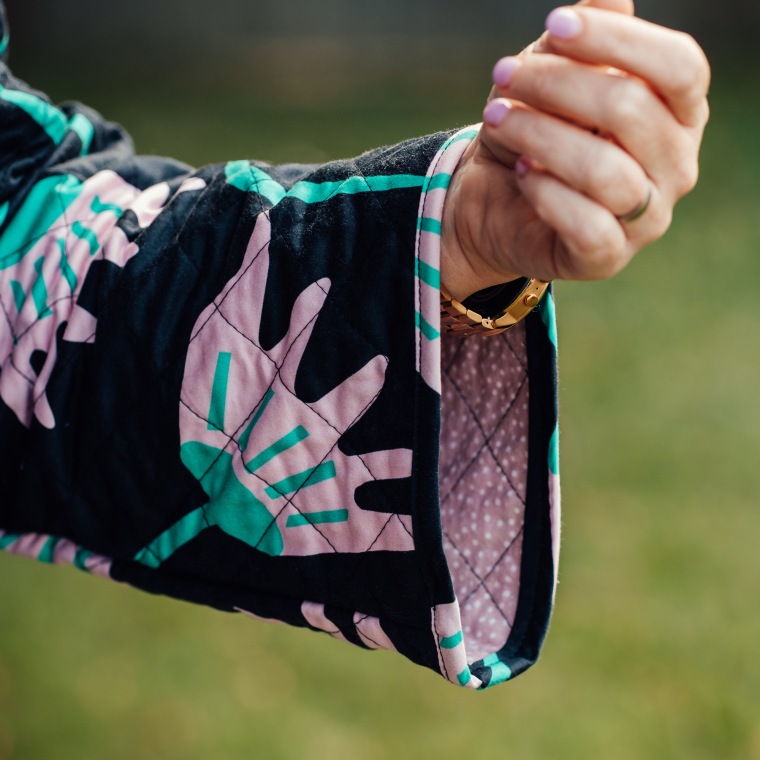
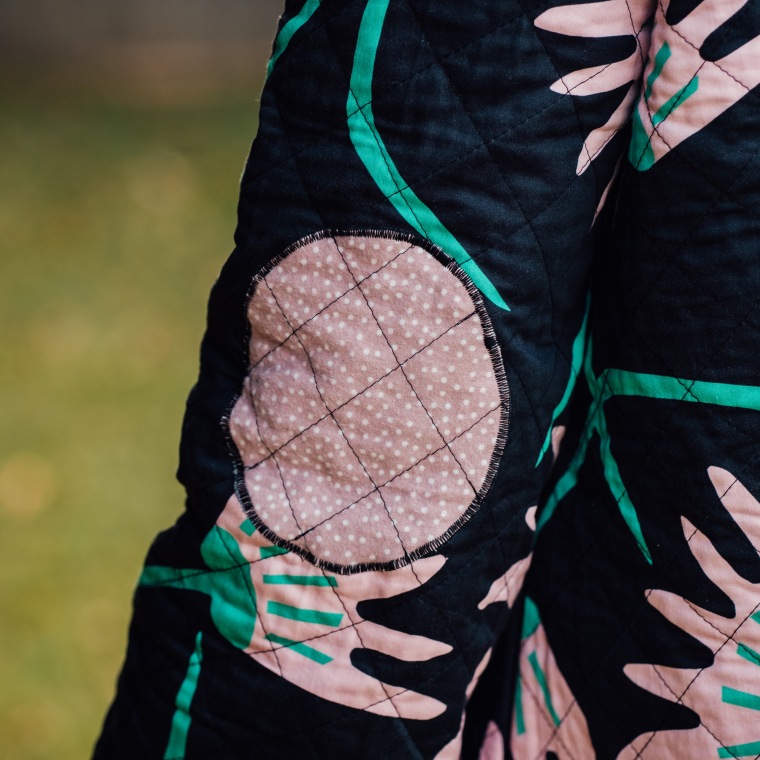
– The elbow patches don’t sit on the elbow for me.

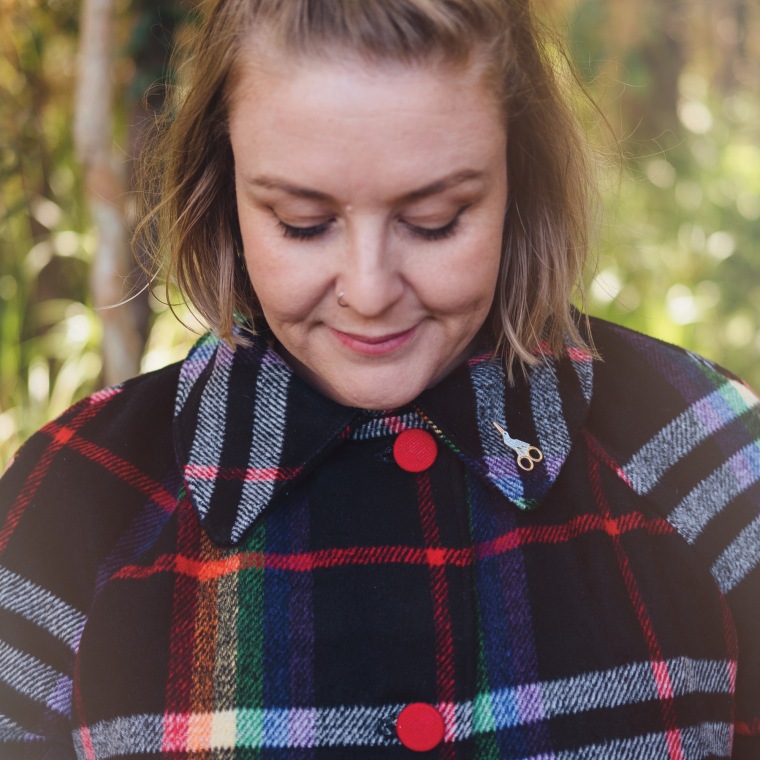
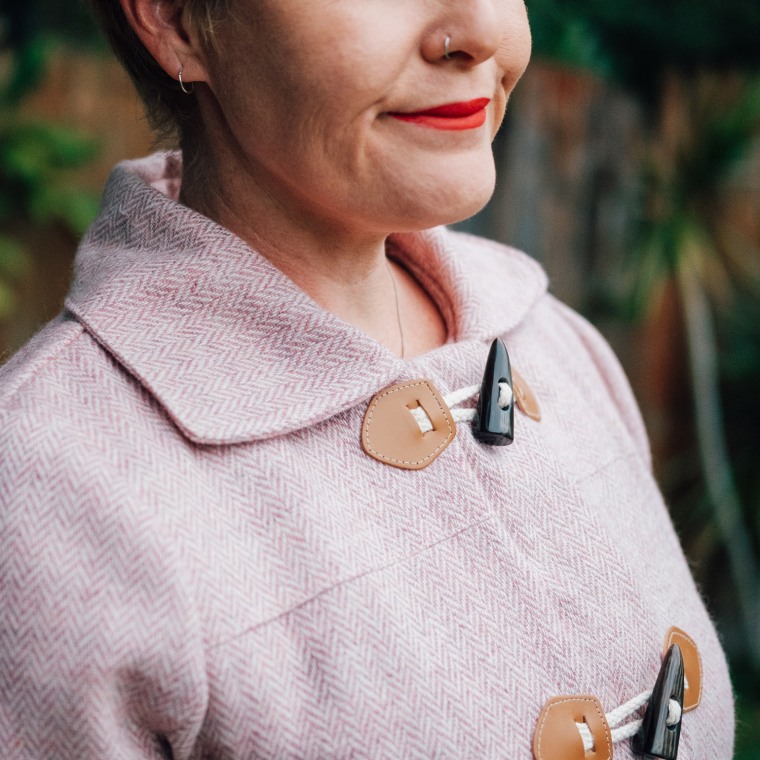
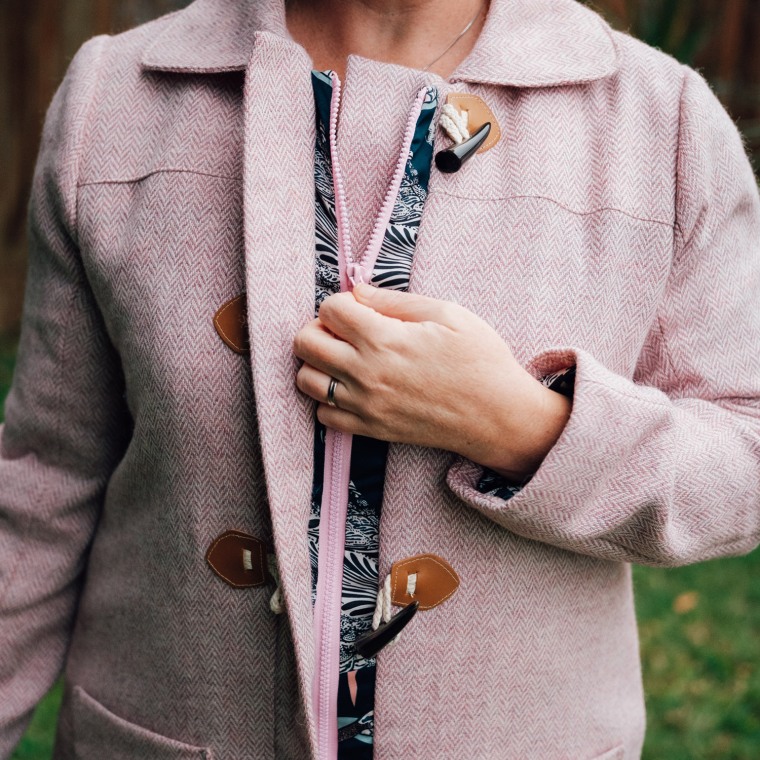
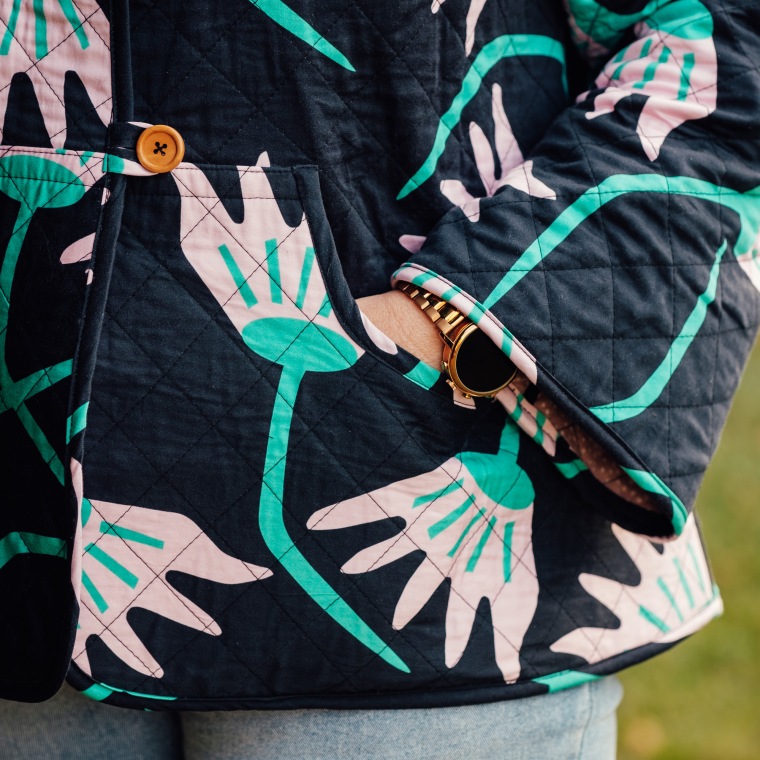
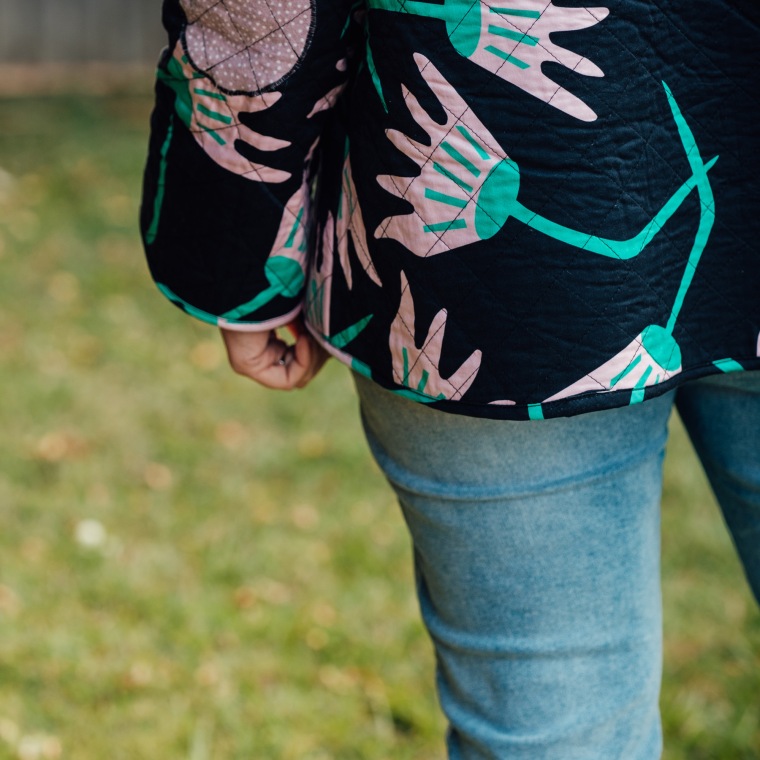
– The pattern says nothing about finishing seams. Because I am a sucker for punishment, I bound all mine. It sure as hell looks pretty though.

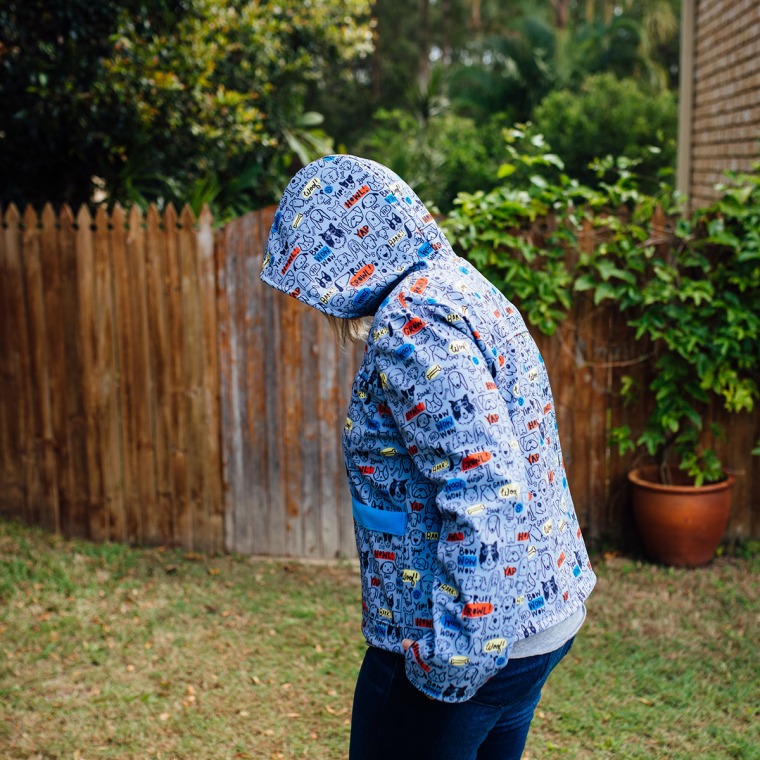
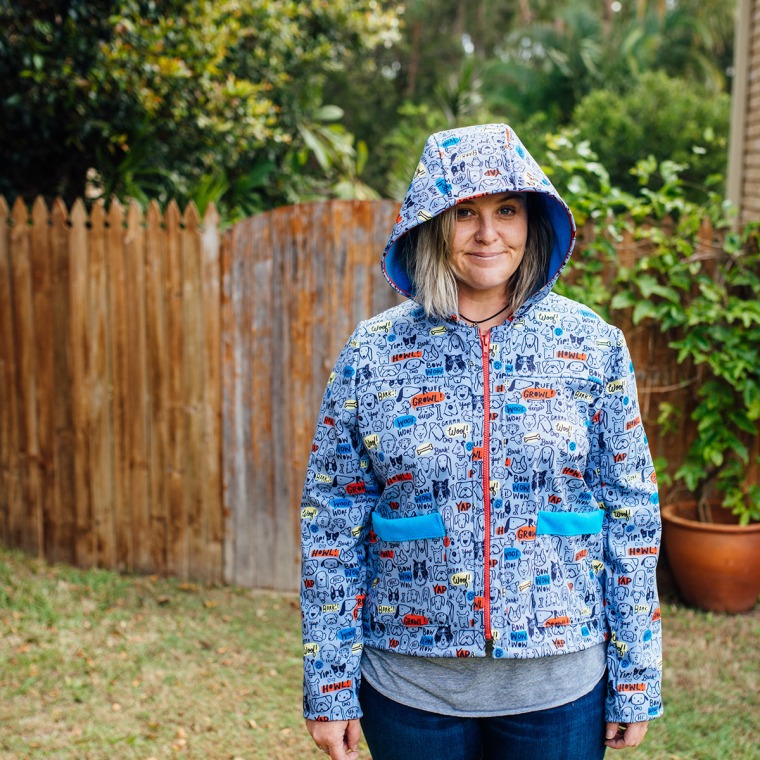
– I had to redo the binding around the neckline so many times. In the end, close enough was good enough. I’m not sure if I was missing something or it’s just tricky. Like I said, the instructions are a bit light on. I have a suspicion that the hood would have been easier.

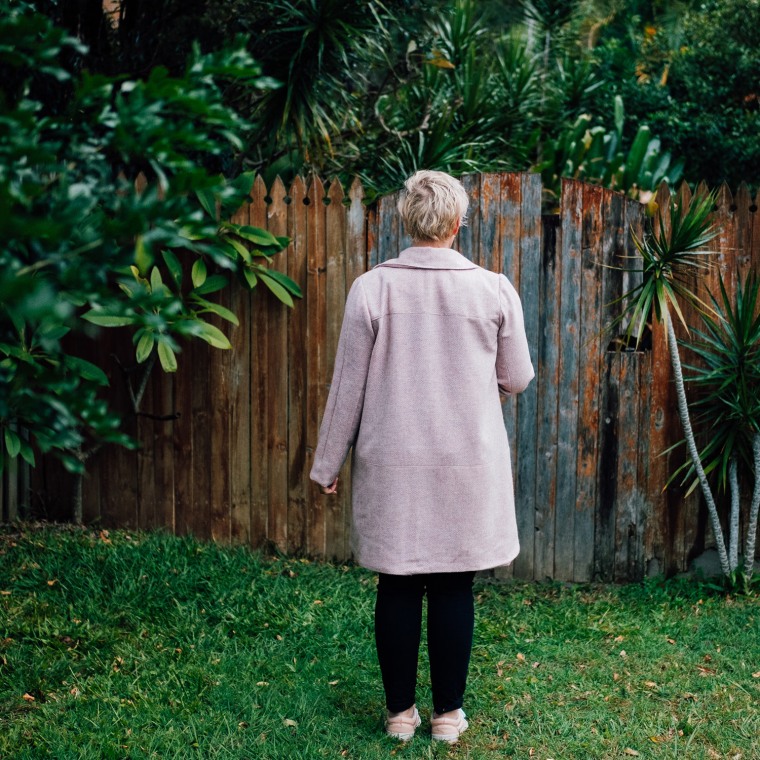
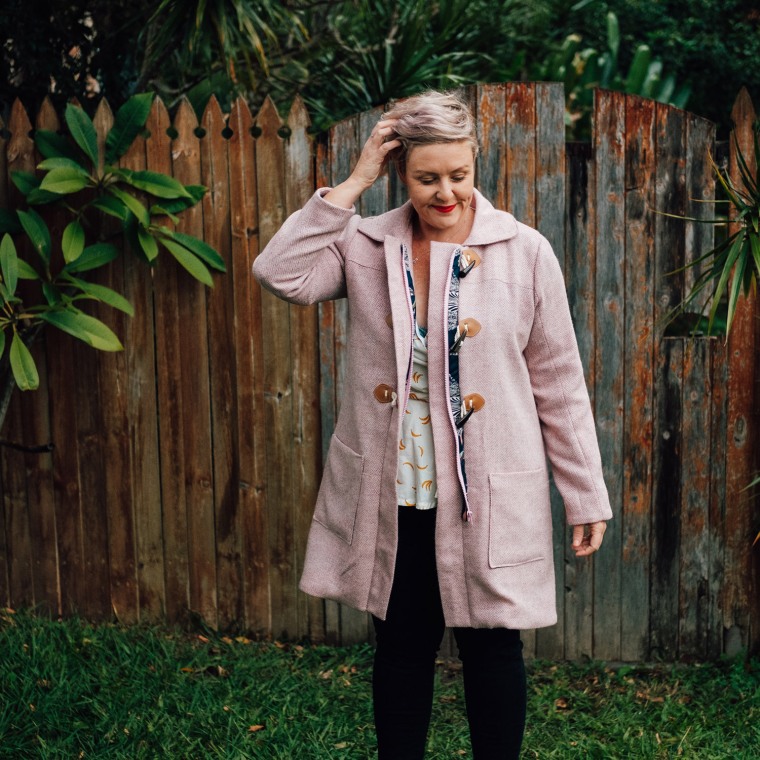
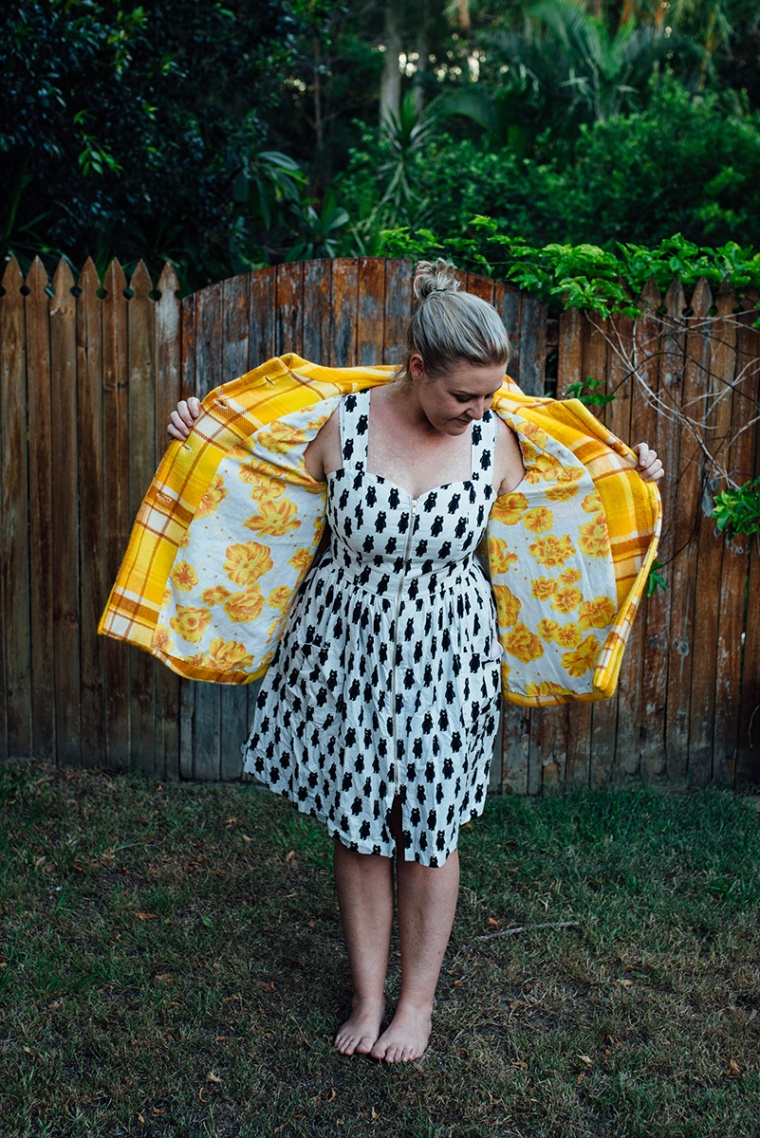
– It’s big. The armholes are low. I have big arms and usually have to grade sleeves up, and these are big even on me. I made mine based on the finished measurements and ended up taking it in a fairly large amount, particularly at the side seams. It was bowing out at the bottom of the back hem heaps. In my wisdom, I had eliminated the centre back seam, so could only take it in on the sides.

webDSCF9870webDSCF9880

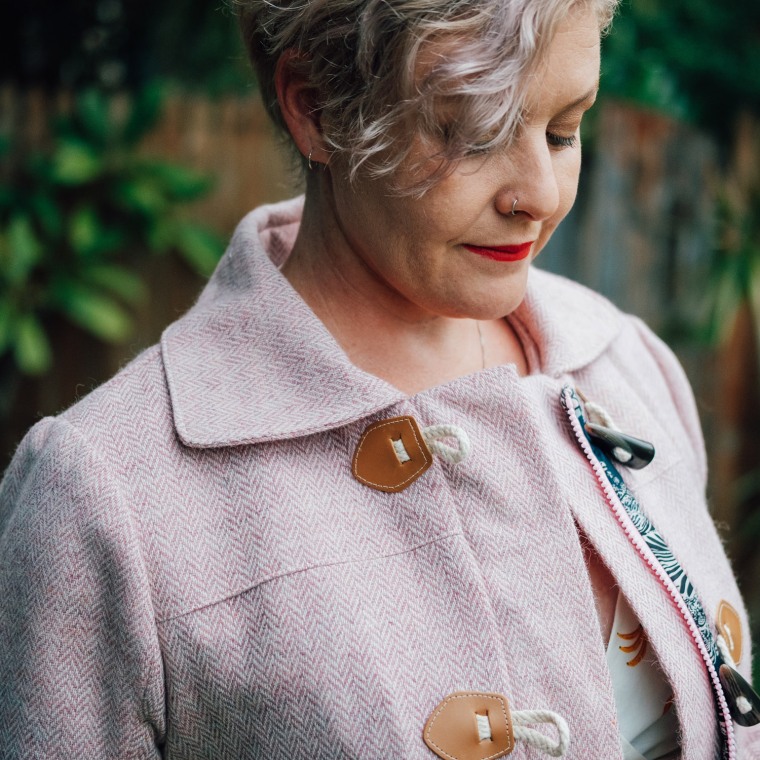
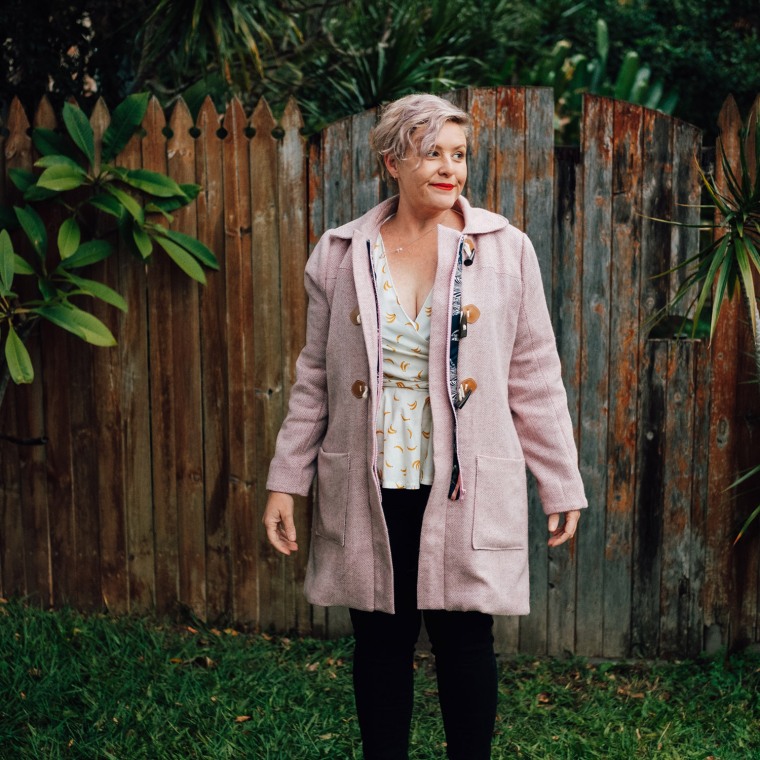
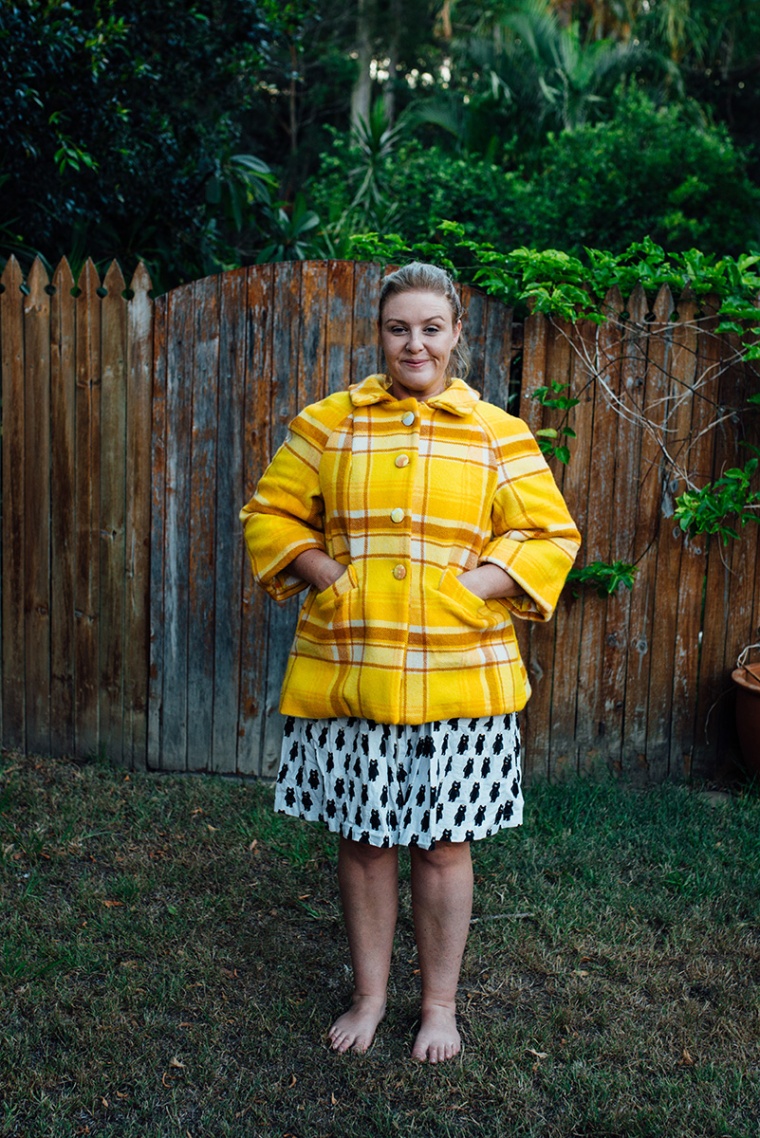
Regardless, she’s pretty , she’s cosy, she’s comfortable and I will wear her heaps through winter.

webDSCF9878

webDSCF9864


That 70s Technicolour Dreamcoat {Vintage Simplicity 5289}

webDSCF9817

I know, I live in Queensland. I know, there’s not a huge need for coats here. But here are some more things – our houses aren’t built for the cold, they are built to let the heat out. It’s not unusual for it to be colder inside the house than outside. And that’s welcome most of the year. For the other two months, we layer. Regardless, I feel the cold. And I like to feel cosy. Besides. WHO CAN RESIST RAINBOW TARTAN? Not I.

webDSCF9792

I ordered two metres of the wool/something blend from Darn Cheap Fabrics (sold out, sorry friends) but I didn’t have a pattern in mind. I wanted something hip length (warm butt please) but I didn’t want to cut through the checks too much. I found this 1972 gem in my stash and the pieces just fit on the fabric. Hooray!

webDSCF9796

webDSCF9799

But sorta not hooray, because pattern matching. Oops. Oh well, as long as the fronts match, right? Yes. Right. However, if you stuff that up then you’re in trouble. Which I did. And was. I re-cut, but it meant then having non matching sleeves. Oh noooooo. No fabric left online either. Mismatched it is then. Sorry if that makes you twitch.

webDSCF9833

webDSCF9805

In other news, I cut the pockets on the bias because I didn’t have enough fabric to match those either. So at least they intentionally don’t match. I used red fabric covered buttons that I scored at an op shop and an obscene leopard satin that I’ve had in my stash for ages for the lining. That charming little label is by Kylie and The Machine. I love it.

webDSCF9840webDSCF9837

I had every intention of bagging the lining, even though the pattern instructions say to hand sew the whole thing in. And guess what? I did the hand sewing. My hand sewing isn’t great, but I feel like I get a better finish. That slippery satin was a bit of a bugger to cut and it wouldn’t have been a nice neat fit into the coat if I’d bagged it.

webDSCF9828

In spite of everything, I love it and will wear it forever.

Ducks Fly Together {Grainline Studio Cascade Duffle Coat}

webDSCF0672

People tend to laugh at Queenslanders when we talk about the cold, but it’s all about perspective, right? Sure, our wintery days might end up a mild 22 degrees, but last week the mornings were starting at 6 degrees and while it might warm up outside, our houses are designed to keep the heat out and it’s often warmer outside than inside the house. It’s not unusual to add layers while inside the house and shed them when out in the sunshine.

webDSCF0671

ANYWAY, the point is that I do occasionally have a need for an extra outer layer. Plus I enjoy the process. Be nice to your Queenslanders.

webDSCF0670

My need for a new coat began when Potter and Co posted a sneak peek of this lovely pink herringbone wool. It was love at first sight. In my early 20s I had a RTW coat from a cheapy chain store in a similar colour and I loved that thing to death and ran it into the ground after a few years. It was time to create a similar version and relive my youth.

webDSCF0669

I have a couple of coat patterns hanging around, but a fancy wool calls for a fancy pattern and the nicest one I have is Grainline Studio’s Casacade pattern. It has a lot of pieces. So many pieces. Separate linings and outer and interfacing pieces. Neat little hem and sleeve facing pieces. Two piece sleeve, yoke, upper and lower outer pieces. Many, many pieces. It’s all worth it though. It feels very fancy and couture once it’s finished.

webDSCF0673

This isn’t my first Cascade coat rodeo, I made the short version a few years ago. I thought I blogged it, but maybe I didn’t because I’m having trouble finding it. Here she is:

DSC_9070

The tartan is cool and all, but I don’t wear it a lot because I tend to live in prints and it clashes a bit. Hence the sensible pink. Also, how nice is it to have a warm butt? The shorter version isn’t as toasty on the rump. I remember struggling with my first Cascade a bit at the time, but I’ve learned a heck of a lot since then so wasn’t too worried about giving it another go. There’s an excellent sewalong for it and the instructions are good. Don’t fear the coat. But don’t think it’s something you’re going to smash out in a couple of hours either. It’s slow fashion at its best.

webDSCF0676

It’s possible I was somewhat overconfident going into this one and I did end up having a couple of issues. Not huge deals, but definitely a few things to think about.

webDSCF0677

webDSCF0714

The wool is quite lightweight, which is ideal for our winter. I don’t need anything super heavy. It also makes it nice to sew, because you’re going through about 6 layers of fabric at the centre front. No broken needles, I’m pleased to say. It did however, stretch and move a fair bit. I unpicked and sewed those pockets on about three times before giving up. They wanted to stretch and move no matter how many pins I used. I didn’t prewash the wool as it’s dry clean only but I did steam the hell out of it as recommended, to preshrink it before cutting. Go me.

webDSCF0709

webDSCF0720

My downfall was possibly the use of the devil’s very own fabric, satin. I really wanted a slippery, slidey but fun lining and those ducks/egrets/cormorants realllllly appealed to me. The colours are ideal. I knew it was going to be a bit of a challenge when I started cutting and it was leaping out of the way of the scissors and generally just being a pain in the bum. Then of course, there’s the pressing – the delicate balance of actually trying to get it to stay flat versus melting it.

webDSCF0710

webDSCF0692

In the end my lining has ended up too big and is bagging a bit on the sleeves and at the hem. I could unpick and attempt to fix, but I’m not going to. It doesn’t hang below the hem so I will just deal. The satin seemed to grow or shrink as I sewed it, depending on whether it was sitting closest to the needle or feed dogs. Words were said.

webDSCF0685

webDSCF0702

Another couple of things for next time:

– I think I need heavier interfacing. This one was quite lightweight to match the wool, but I feel the bands would sit better with a more gutsy interfacing.

– The zipper bands should be interfaced. I really don’t know why they aren’t and I’m really annoyed at myself for not doing it. I know better.

– The bottom of the coat wants to sit open. I can’t get those bands to sit flat. Might be my giant hips, might be because it wants another closure, might be because my interfacing is too flimsy. Could be a combination. I will say though, I searched through blog posts and instagram hashtags and found that almost every single other maker has the same flippy band at the bottom. So at least it’s not just me. And am I really bothered? No. Do I feel like I have to point out every flaw in my sewing? Yes. Ha.

webDSCF0701

webDSCF0704

Challenges aside, I bloody love this coat and will wear the heck out of it for the 12 days of winter we actually have.

PS Toggles seem hard to find, but Grainline have a good tutorial on making your own. Mine are from Spotlight, but I’ve had them stashed for a couple of years.


Crazy Dog Lady Item #456 {Grainline Studio Cascade Duffle Coat}

webDSC_7855

Duffle coat? That ain’t no duffle coat!

Correct. I’m honestly bloody proud of this effort because I had to adjust that pattern in ways my brain really didn’t like, but look! I love it.

webDSC_7857

So, I was bumbling about in Spotlight recently (something I don’t get to do often because our nearest store is 45 mins away, but they had $5 patterns so it was worth the trip) and found this really cool soft shell fleece. I’d never seen anything like it available as fabric before, but to be honest, I’ve never really looked. They had two prints – the dogs and a cloud print in pink. That was an agonising decision and quite frankly, I can’t promise that I won’t go back for the pink. At $20/m I thought it was pretty well priced and it feels like it’s decent quality too. So I grabbed two metres and hoped that would be enough for a jacket.

webDSC_7859

Main Fabric: Soft Shell Fleece from Spotlight

Facing Fabric: Cotton and Steel

Pattern: Grainline Studio Cascade Duffle Coat

webcascadecoat

I’ve made this pattern before as per all the instructions and I do love it. And maybe if I’d used my brain, I could have scoured the pattern books for an unlined, zip up jacket pattern instead. But noooooo. I assumed I’d have something suitable in my stash at home. Well, turns out I didn’t.

That’s fine! I’ll just adjust the Cascade pattern!

Alright in theory, a bit harder in practice. The coat is lined and I didn’t want my jacket to be, so there were a few adjustments there. I ended up binding each seam so it looked super pretty. I regretted that decision about halfway through, but now I’m really glad that I made the effort.

webDSC_7861

FYI this stuff doesn’t seem to fray and besides that, I could have overlocked everything to finish it, but this looks cooler. Wobbly stitching and all. Those armholes were a bugger.

I was most worried about omitting those zipper bands and attaching the zip to the front pieces. I just extended the front band slightly and facings slightly and it all turned out fine. I don’t know if that’s the legit way to do it, but it works for me.

webDSC_7875

The original pattern has facings to finish the hem, sleeves and hood. I wasn’t sure about the additional bulk with this fabric (in hindsight it probably would have been fine, it wasn’t a problem to sew anyway), but I figured I’d just continue with the binding and finish the raw edges that way. Until I ran out. So I used the cool C+S fabric for the hem.

webDSC_7884

I probably should have sewed the pockets on before the facing, but I don’t mind that the stitching is through the facing, it holds it in place. I also stitched it though the jacket at the shoulder seams because it was flipping up all the time. In the proper duffle version, you stitch it to the lining, so that’s not a problem and the finish is super clean.

Anyway, damn pleased with this guy. Not sure how water proof it is, but it will be great for those chilly days when it’s windy and I’m sure it will go ok in light showers.

webDSC_7881


Sunshiney Coat Sewing {Vintage Simplicity 8591}

webdsc_5488

Do you remember that episode of The Great British Sewing Bee when Jade made that awesome vintage coat with 3/4 sleeves, cute collar and covered buttons? No? Just me? Well, from that moment on I had to have a coat like that. It was love.

webdsc_5484

So when I was raiding my friend Phoebe’s pattern stash in Melbourne the other week and found this beauty, I almost did a little happy dance on the spot. Or maybe I just muttered ‘Heck yes’ to myself. I’ll never tell.

Since then my insta sewists have informed me that this pattern has been reissued as Simplicity 1197, so you can get your hands on it if you are that way inclined.

webdsc_5476

As soon as I saw that pattern, my fabric stash flashed before my eyes and I knew exactly what I would use. This amazing yellow wool blanket for the outer and cotton sheet for the lining. Both vintage, both scored from op shops. Match made in heaven.

webdsc_5473

Then, to complete the holy trinity, I found these vintage green buttons at another op shop on Monday. Bigger than anything I had in my stash, I knew they would be ideal for the coat. But how cool would it be if I could cover them in the sheet fabric? Could I? A quick google told me that I could and here we are in cute button heaven.

And even though it was still stupid hot today (hello, autumn) at a balmy 34 degrees, I just tortured myself by sitting with a woolen blanket in my lap most of the day. Sweating it out, sewing this beast. Once I have an idea in my head, there’s no stopping me. I’m stubborn that way.

webdsc_5474

So, details. Every piece of the coat is vintage and scored from op shops, which I think is kind of special. As far as fit goes, it has its quirks. This pattern is for a 38 inch bust, which falls short of my 42 inches. But again, knowing how vintage patterns love their ease, I risked it and it’s completely fine. I love the fit actually. It’s quite possibly designed for a climate much colder than ours, therefore needing room for multiple layers. But since the most I’ll wear under this is a long sleeved t shirt, we’re all good there.

webdsc_5486

Can we talk pattern matching? Because I was pretty successful with the front and sleeves, but failed on the back. Oops.

webdsc_5512

See those raglan sleeves? They puzzled me at first, but I love them. They fit really well on my shoulders. I thought the darts were a bit weird, but they’ve grown on me. The only major change I made was to the length. If you look at the pattern illustration, it shows the coat hitting just above the knee – when I tried this baby on it was hitting about 10cms above my ankle. Um, what? Were women of the 60s amazing amazon women? I looked like I was wearing my dad’s dressing gown. So off came about 40cms. I could have made it shorter again, more just below waist level, but I’m happy enough with how it turned out.

webdsc_5478webdsc_5479

Welt pockets. OMG. First time attempting those sneaky bastards. I was trying to follow the directions on the pattern, but because vintage patterns assume errrrrrybody knows how to sew, the instructions left me throwing them and saying all the swears. I had a little google and found some good tutorials, but I figured the best way to learn was to just jump in. Jumping in is hecking scary when it involves slashing your fabric. So they aren’t the best. But they’re in. And I learned something. Sort of.

webdsc_5482

The pattern calls for a lot of hand sewing. Basically the entire lining is hand stitched to the outer. LOL, no. I machine stitched it to the facings and then hand sewed the sleeves and hem. Again, sort of. I don’t really know what I’m doing and probably should have used a blind stitch, but I’m happy with how it turned out.

webdsc_5477webdsc_5481

My machine refused to auto do the buttonholes due to the thickness of the fabric, so they’re a heady combo of machine hack job and hand sewn hack job. Also I think maybe the sleeves should be shorter? Are they in the ‘oops she cut her sleeves too short’ zone? They look in line with the illustration, but I’m not sure.

webdsc_5506

webdsc_5508

Thanks for reading such an epic post and sorry I look slightly drunk in most of the images today. Not sure what’s going on there. It has been an epic couple of weeks.