I was given this pattern in exchange for a review. Just in case that’s not clear below.
You lot know how I am about swimmers, right? The same way I am about sewing underwear. I love it. It’s hard to explain, but there’s something very satisfying about those little seam allowances and stretching that elastic so it’s juuuuust right. Or maybe it’s because I don’t have to try them on my size 14 dimpled and pale body in little change rooms under fluro lights anymore. Or maybe it’s because they are not traditionally ‘home-sewn’ things and when people ask where you got your rad swimmers and you say you made them, their minds get a little bit blown. Plus they are fast to sew.
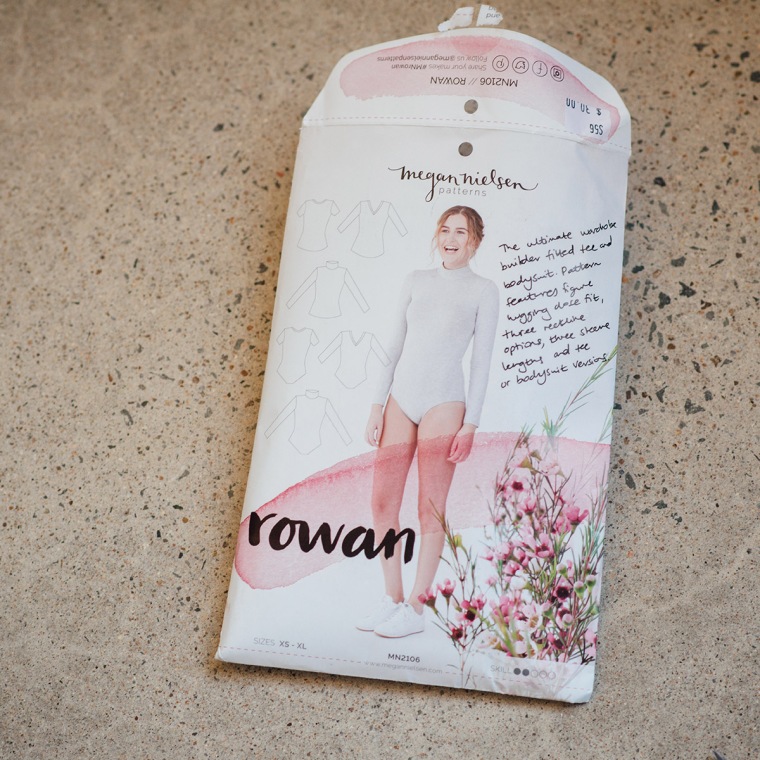
Now, for the most part my swimmers are based on underwear patterns because there aren’t a heap around that tickled my fancy. In fact, some of my faves are based on Megan Nielsen’s Rowan bodysuit pattern. So when lovely Anita from Megan Nielsen got in contact and asked if I’d like to review one of the new patterns, I was keen. Super keen. But I had a lot on my plate, so I tried to be a responsible adult and decline the offer. Anita told me that was totally cool, gave me a later deadline and flicked me the Cottesloe pattern anyway, just in case I could make it work.
WELL. Curiosity got the better of me and I opened the files to have a look. One thing lead to another and here we are. I couldn’t resist. It was the simple swimwear pattern I’d been looking for. I knew it wouldn’t take long to make and I was super keen to give it ago. In fact, I managed to bash out two pairs in one afternoon.
This floral version was my toile. I made the straight size 14, from the standard 0-20 pattern (my measurements put me in between the 14-16). The fabric was given to me quite some time ago, but is quite possibly from Boo Spandex and I’ve lined it with lightweight black swim spandex (as opposed to lining, it’s nicer to work with and a bit more supportive). That’s it. No changes, all very simple and the fit is pretty close to spot on. It’s got a surprising amount of support (no foam cups in this version) and the fit is better than I expected – especially since there are no bust seams for shape. For reference, I’m somewhere in the vicinity of a 38DD.
With my very wearable toile complete, I moved on to my good fabric. Spoonflower sport lycra in a Beetlejuice themed print I designed. I’d been holding out for the right project and this was it – no seams to cut into those sandworms. Here I’ve got my lining (again, lightweight swim fabric) underneath and my fabric on top so I can cut them out together. Did I mention I love that nothing is cut on the fold? More accurate when working with knits like this, for sure. Plus, you can check how the print is placed.
One slight change I wanted to make was to move the back straps more toward the centre back. This is a common adjustment for me. I literally chopped the straps off the pattern piece just above the armpit curve, moved them about 2cms in towards the centre back and then redrew the curves. I’m not sure if that’s technically correct, but it worked well. You can barely see a difference in the images above, but I can definitely feel the difference when they are on.
I added foam cups to my second version to see if there was much of a difference in support. There is a little bit of a difference, but not a huge amount. I didn’t find my first version unsupportive though. The foam does give you slightly less stretch across the front too. Not enough for it to be a problem for me, but maybe something to keep in mind.
I ran out of wider swim elastic for my second version, so lined the band with powermesh instead. It worked very well.
You can see the scoop of the back is more pronounced since I moved the straps across.
This is a simple, fast sew and a great introduction to sewing swimwear. As always, Megan Nielsen’s patterns are well drafted with excellent instructions. She’s recently extended her sizing, so these go up to a size 30, which is bloody brilliant.
I love the high waisted bottoms and am impressed with the amount of support I get from the top. A top in this style is always going to provide more compression than shape, but I think it’s one that will suit a variety of sizes. When summer comes around again, I’ll definitely give the one piece a go too.
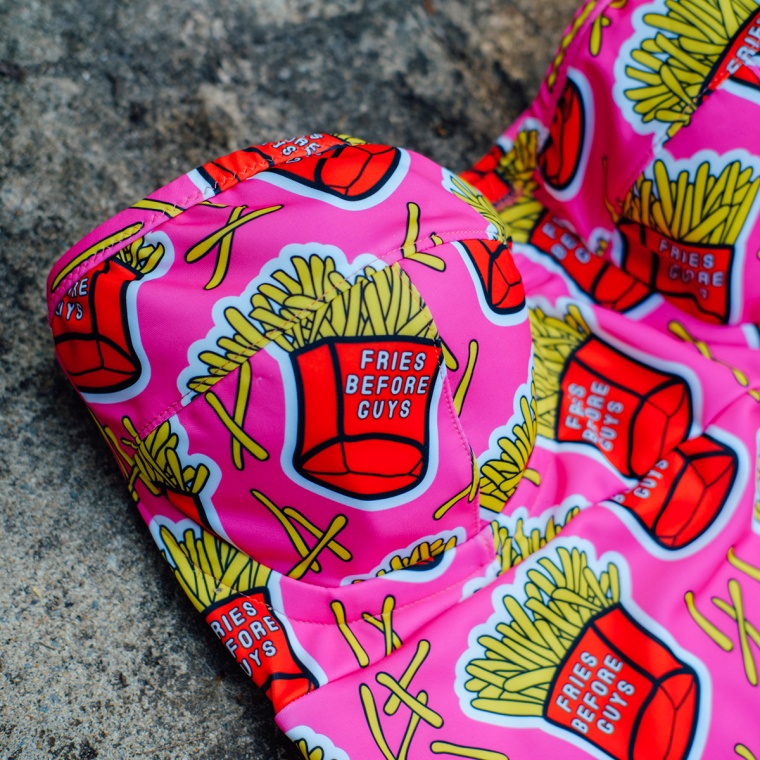
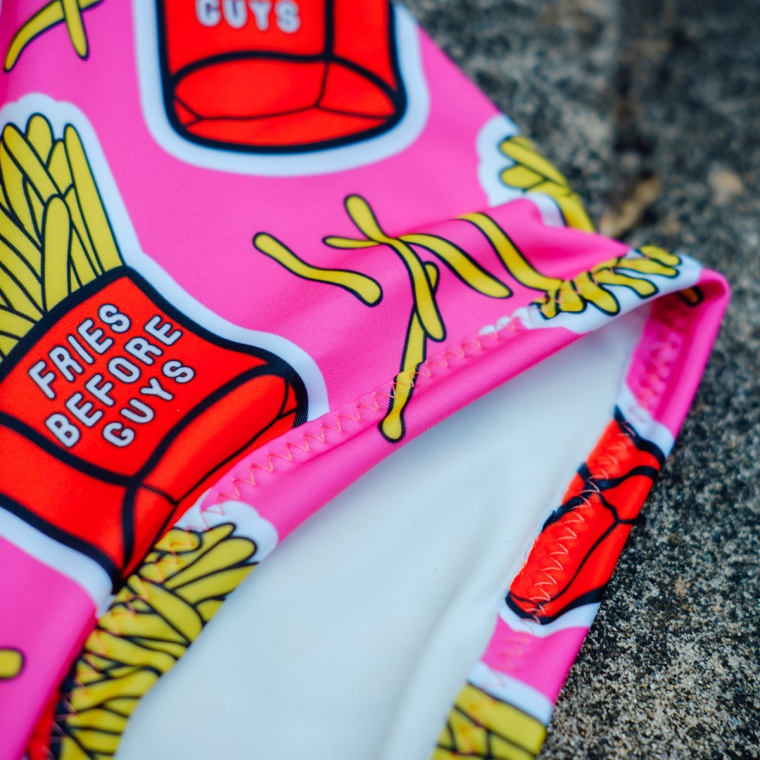
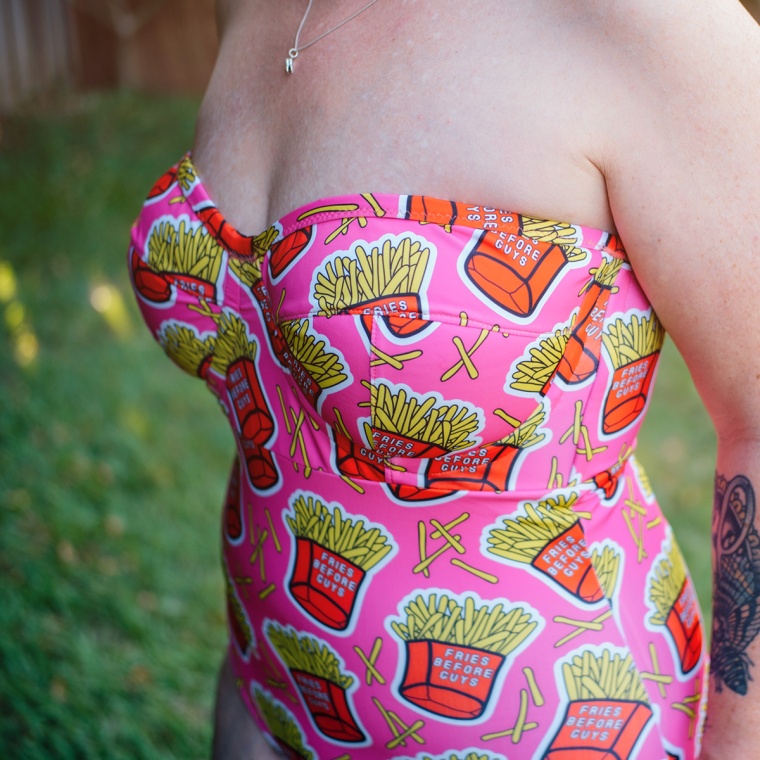
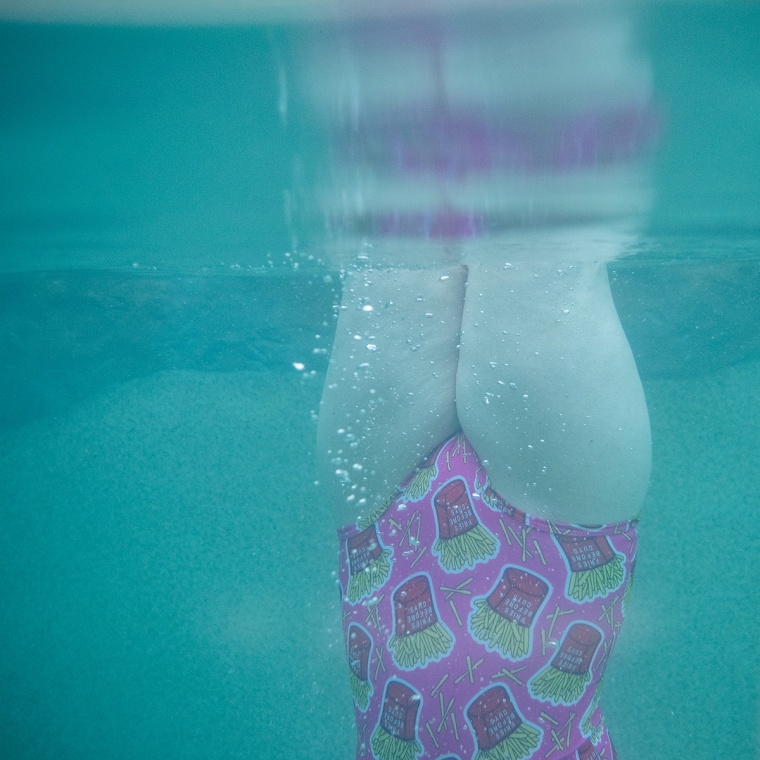
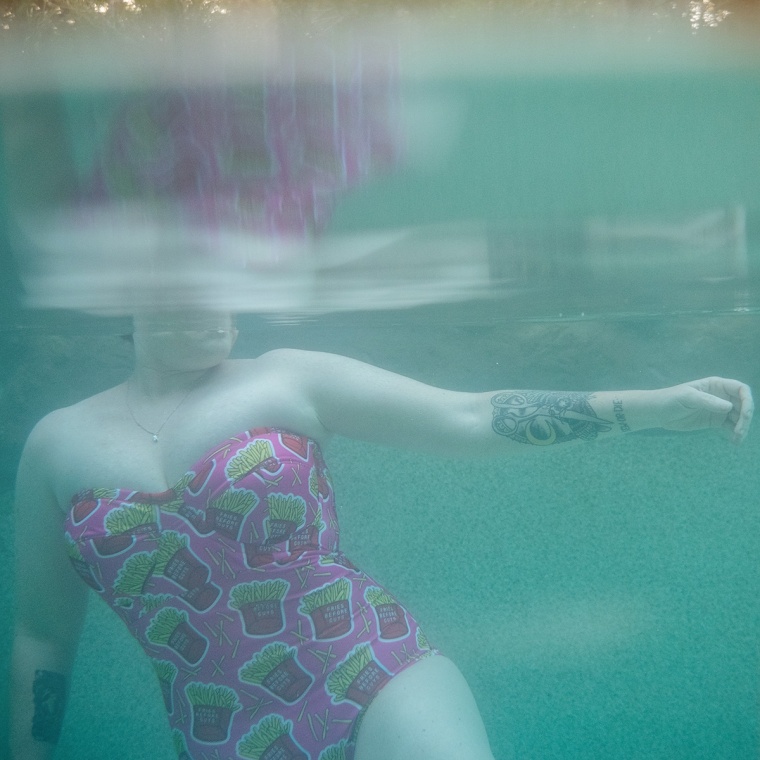
Look, I’m a bit of a fraud because my body tends to reject chips (fries, chips to us here in Australia), even though I love their crispy, carby, salty goodness. Most of the time my skin is like ‘nah, we aren’t about those anymore. Have some acne for your attempt, though’. Who could resist this print though? It’s a bloody winner.
I know you want to know where the fabric is from and what the pattern is, but you’re going to hate me for it. The fabric (which is swim) was a pre order from Indie Skye fabrics and I don’t tend to go for pre orders because I’m damn impatient and hate waiting longer for my fabric than is entirely necessary. But I decided this fabric was worth waiting for. The lining is lightweight swim spandex from The Remnant Warehouse because it has a bit more body than regular old swim lining. And it’s nicer to sew.
What else? Well there’s some foam (complete with my markings still, please ignore. But it is good to mark all the points on your cups so you don’t sew them around the wrong way, they look very similar) from Sew Squirrel, underwire casing, underwires, swim elastic (all from The Remnant Warehouse also, from memory) and some sheer cup lining for the upper cups and bridge (pretty much because I wanted those pieces to stay stable and maintain their shape). Also there’s some boning in the side seams of the bra portion, which is just cable ties cut down.
Pattern, well bear with me for that one. The lower portion is Megan Nielsen’s Rowan bodysuit. If you’ve read posts on my one pieces before, you’ll know I’ve used this many, many times. I like the fit. Obviously I line it, eliminate the crotch snap part of it and bind or band the legs, but you could use swim elastic and fold over too. I have big legs, I don’t really need the elastic to pull everything in. I just use good old zig zag because I don’t have a coverstitch machine, I hate twin needling and even though it’s very Becky Home Ecky, if someone on the beach is judging my zig zag, that’s their problem. Because they’d have to be in my lap to see it and that would be weird. You know they aren’t though, just as they aren’t judging my body. But more on that later.
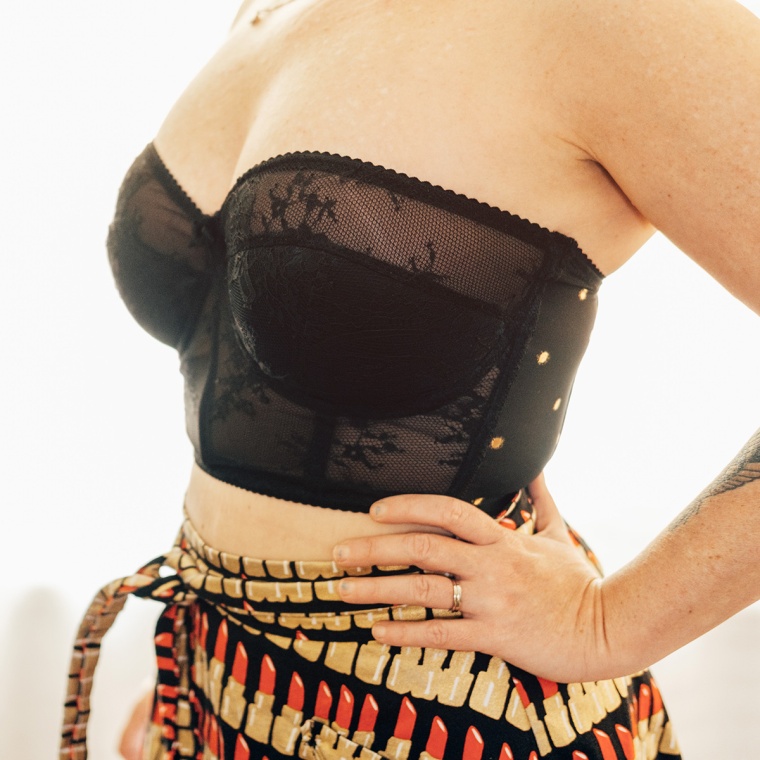
So, the bra part. I know, it’s a bit of sorcery and I wasn’t even sure that it would work. In fact, I was almost positive that it wouldn’t and I’d try it on and have cups folding over and boobs heading towards their old friend, my belly button. I figured I could add straps at the end if I wanted to, but I also wanted to just see if it would work. FOR SCIENCE. You know I love bra sewing though. I love the challenge of it, I love the precision, I’ve even grown to love the little 1/4″ seams. I love watching cups go from flat to boob shaped with foam and wire, I love making the finish really lovely and enclosing the seams. It’s just my happy place. You know?
If you’ve been following along lately, you’ll recall my strapless bra journey. The new guy is the same pattern, shortened, with a bit taken off the upper cup (because it was too high and also to compensate for not folding over with the picot) and boning left out of everywhere except the side seams. On that note, I think the boning is part of the engineering magic. It stops it from wanting to roll down with the weight of my bust. Also, those extra long wires help for the same reason. The keep it tacked to my chest and in place under the arms.
Here are some technical construction and fit notes you can scroll past if you want:
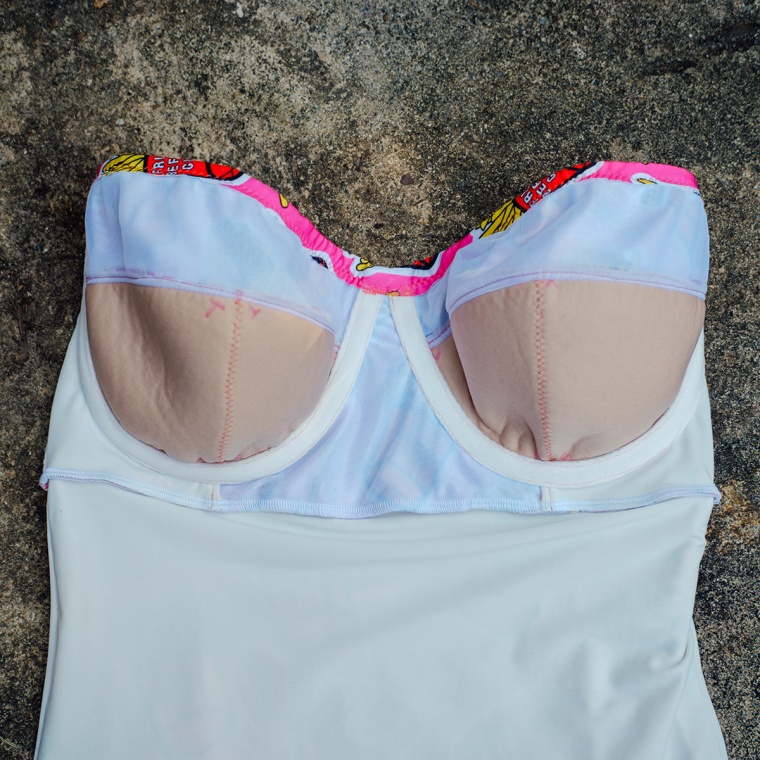
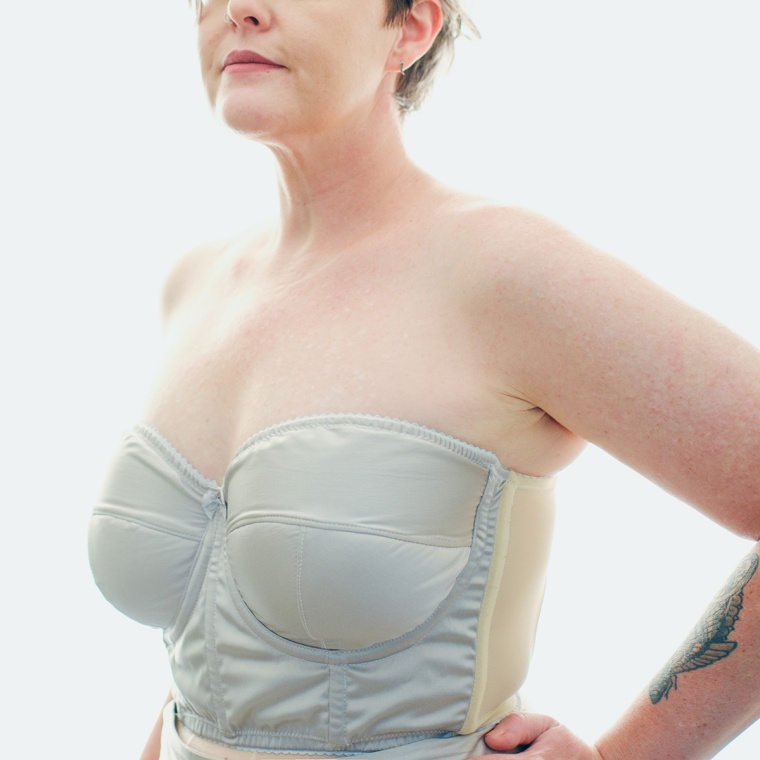
– Stabilising the bridge with bra lining (which is strong but super light) stops it from stretching out and distorting the cups shape. But it also makes the whole thing a bit harder to get into. Next time it might be wiser to add some sort of closure – either a zipper down the front or some kind of clip at the back. I do like the comfort of not having any closures though.
– To make sure the bra part would fit on the body part, I just lined up the pattern pieces. They were super close and I didn’t need to change a thing. I cut the back band piece of the fold and there’s no hook and eye like on the bra versions. This made it a bit smaller across the back, but the fabric has a bit more stretch than the traditional power mesh band of the bra version, so they sort of cancelled each other out.
– I was very close to cutting the upper cup pieces out of swim lining, but realised my bra versions have no stretch there, which is really important – it needs to hug in close. If it stretched out, there might be some gaping and more risk of a wardrobe malfunction. So I used the very stable bra lining there too.
– Contrary to popular opinion (I see this all the time in sewing groups!), the foam is for support, not to enhance bust size. If the foam wasn’t there, the whole cup portion would drop. Same for sports bras, especially if there’s no wire. I often see people request sports bra patterns without wire OR foam, stating that they are already big and don’t need extra padding. But foam is great for support and is often necessary for bigger bust especially. Don’t fear the foam. I’ve used straight stitch to top stitch the cups (instead of zig zag) because they don’t really stretch and I don’t want them to. The foam has a tiny bit of give, but not much else. But you can totally use zig zag if you prefer the look.
– The only other part that made me stop and think was how to finish the top of the cups. In my bra versions, I’ve used picot because I like the look and the finish. It’s a bit too ‘I’m a bra’ for swimmers for me though and using binding in matching fabric is usually the way I finish raw edges. Obviously in strapless swimmers, the top part really needs to stay put, so rather than just using strips of fabric as binding (which doesn’t need to be cut on the bias like woven, FYI), I used swim elastic in there too. Same method as usual, which is putting a bit of tension on it all the way around so it hugs towards the body. There’s a little mention of that method in my video here, but in relation to finishing the leg openings.
– I decided to run the binding all the way around the top edge, as opposed to finishing the bridge first without binding (ie sewing lining and outer fabric right sides together and flipping, which is how I generally do my bras) and finishing the upper cups before adding them into the frame for a couple of reasons. Firstly to minimise bulk. The binding plus elastic adds a fair bit of bulk, which in turn makes it harder to sew down the underwire casing at the underarm and bridge. Much easier to sew over everything at the end. Plus, I would have had to fiddle around with seam allowances at the upper cup – cut them down to counteract the fabric lost when folding over picot to make sure it lines up with the finished bridge. God I hope that makes sense. It’s really hard to explain. Anyway, much easier to cut the upper cups down as needed to line up with the bridge once they’re already sewn into the frame. Then bind the whole thing in one hit.
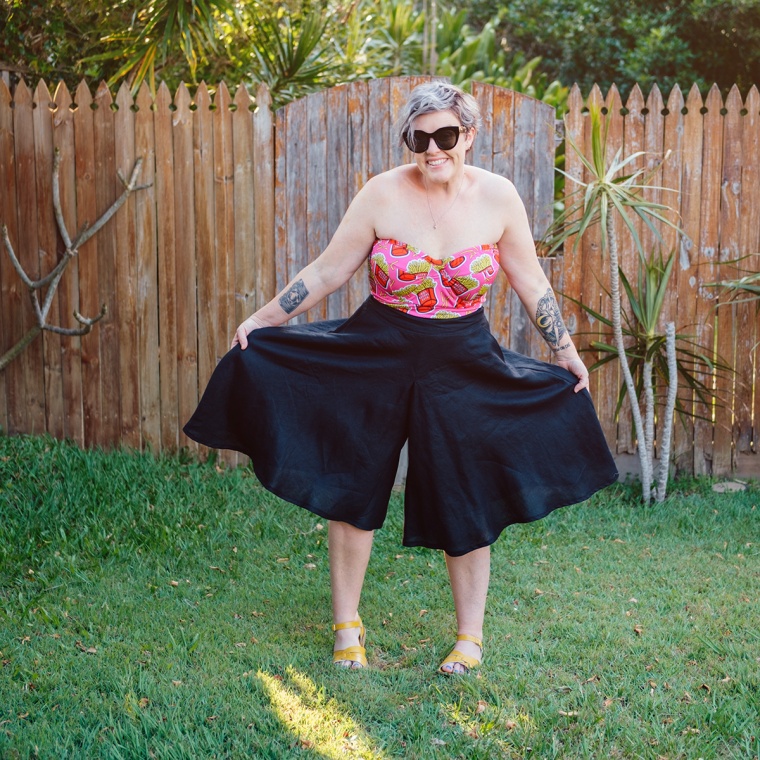
As usual, I’ve used far more words than I had planned. If you have any technical questions, just comment and I’ll try to answer. I’ve never had any proper bra training, but have learned so much from trial and error. And what is that sensible black skirt I’m wearing? Is it a skirt?
No! It’s the Tania culottes in linen from Potter and Co! Trickery! This is the updated version, which Megan so kindly sent me. Its now got pockets and extended sizes. Truly one of the most wearable things I own, especially for work. Photography work, that is. I’m often getting down on the floor and these make it much easier. The only change here is that I’ve used my own curved waistband, because as I’ve mentioned many times in the past – rectangle waistbands don’t work on this short waisted, curvy body. There’s too much of a difference between my hip and waist measurement and I get gaping in the front and back. Imagine pinching a dart out of the top of the front and back waistband pieces – that’s the shape I need.
So, back to the swimmers. I’ve tested these babies in the pool and they passed with flying colours. The real test will be in the surf. But I can still add straps if required, probably removable ones so I have options. I really like how these have turned out.
If you’re anything like me, you might have some of those pesky voices in your head – you know the ones, they like to say mean things and make you feel crappy about putting on your swimmers and enjoying yourself at the beach or the pool. Mostly I can shut them up, but there were a couple of persistent ones when making these. The first being that strapless things are for smaller bodies, particularly slender arms and backs. The other one was the fabric. Weirdly, I have had issues about wearing food prints before. I know it’s ridiculous, but I felt like I was saying ‘hey! look at me wearing food that contributes to this fat body!’. So with this fabric screaming its fries-positive message, all I could think of was people would look at me and think, ‘well, obviously true for her’. I know how crazy that sounds. And I’m wearing them anyway, because I made them and I’m proud and I love how fun the print is. So there, voices. You can shut up now.
Over the weekend I had a craving for some rock solid bra sewing. Can you have sewing cravings? I do. I love bra sewing for the same reason I love swimwear sewing. It’s very different to sewing a dress, it’s a bit challenging and it’s one of those things that really throws people when you tell them you made it. I always feel very accomplished when I have a bra that fits.
Of course, the extra level in bras is the fit. Especially wired bras. I always say that sewing them isn’t the hard part – it’s the fit that can drive you nuts. Once you have that down though, you’re golden.
Even though these aren’t my first Marlborough bras, I went the extra fitting mile this time and compared wire sizes to my breast root. This basically involves standing topless in front of a mirror and holding up a variety of wire sizes along the underside of your breast to check which size fits best. Then you make the bra to fit the wire, rather than buying wire to fit the bra you made. The theory is the fit is more accurate and I totally agree.
So, turns out I had been making the correct Marlborough size all along (a 40D, although my measurements put me in a 40B according to the pattern), but using a slightly different wire size has really elevated the fit. They are so comfortable. I used to scoff when people would say that you don’t feel the wires in a correctly fitting bra, but it’s definitely true in this case.
The floral print in the first bra is Cotton and Steel cotton spandex jersey. Not recommended for this particular pattern because it stretches, but I’ve lined it with bra lining to counteract that. The fabric for the second is a rigid lace from The Remnant Warehouse and the fabric for the third is some sort of mesh with velvety stripes (also from The Remnant Warehouse). I wasn’t even sure that fabric would work for a bra because it’s quite heavy, but it turned out really well. All are lined with bra lining and the seams are enclosed.
All the side panels in the knickers are non stretch, which meant I compensated by cutting the front and back panels a bit bigger. The top pair use that lovely cotton lycra for the main part and I’ve used nice stretchy black spandex for the other two pairs. Bra hardware, strapping and elastic is all from Booby Traps.
Is there anything that boosts your self esteem like well-fitting, comfortable lingerie?
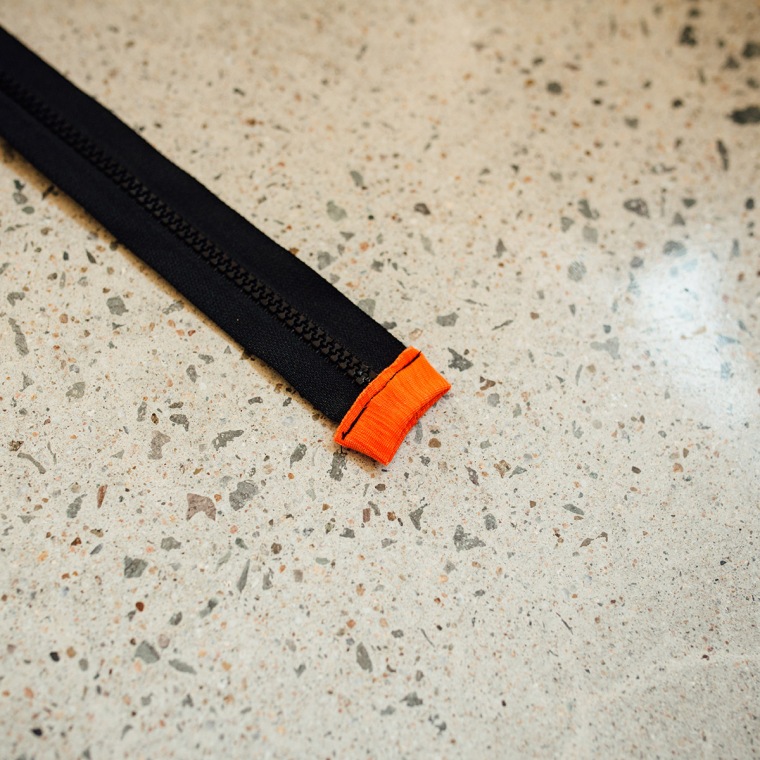
A chunky plastic open ended zipper (51cm) from Spotlight.
A couple of strips of light to medium weight iron-on interfacing.
I’ve used the turtle neck t shirt pattern pieces from Rowan, but instead of cutting the front pieces on the fold, they’ve been cut into two pieces with a bit of seam allowance added for the zipper. I’ve added the same allowance to the neckband piece. The first video covers the basic construction of the rashie – sewing the front pieces to the back and sewing in the sleeves.
The second video shows how I add sleeve bands instead of hemming the sleeves and also adding the neck band.
The third and final video shows how to interface the front edges to stabilise them before adding the zip. Then I finish off the neck band and hem.
Super awesome bonus round:
Making matching, fully lined bikini bottoms from the free Acacia pattern!
I make swimmers from underwear patterns quite often and this is something I get asked about all the time. What takes something from knickers to swimwear? Let me show you. Spoilers: Fabric choice, lack of gusset, including a lining and leg and waistbands instead of picot.
I also added some height to these are they are quite low.
More tigers! It’s a thing for me right now. These Flint shorts were my first make from my brand new Janome 3018W. She’s quite dreamy, but I was weirdly paralysed for over 24 hours when she first arrived. Strange right? You’d think I’d be all over her. But I couldn’t find the brain space to learn a new machine and I think I was still mourning the loss of the old one.
But I snapped out of that ridiculousness, of course. It took me a couple of minutes to glance through the instructions, figure out how to thread the new girl and then move on from there. But what would I make? Conveniently, a large box of fabric had just arrived. All of it was lovely, but the tigers are just so cool. And I already had black thread in my overlocker. So what pattern? I’ve made a few dresses lately and thought the tiger linen was really keen to be made into shorts.
Yes, shorts. Even though I don’t wear them often. In fact, it’s only been over the last 12 months that I’ve started wearing them again. I reckon shorts didn’t touch my body for around 8 years at least. But no more. I’ve come to realise cellulite and chunky thighs are normal and shorts are perfect for our climate.
What are these beauties, then? They are Megan Nielsen’s Flints! Hoorah! I have made both the pants and shorts before and I love the cool way they close via the pocket.
This time though, I adjusted the pattern to eliminate the tucks and make them flat fronted. Megan has a tutorial for that here. I think the print looks better without the tucks. And if I’m going to make the same pattern again, I do like to change it up a bit.
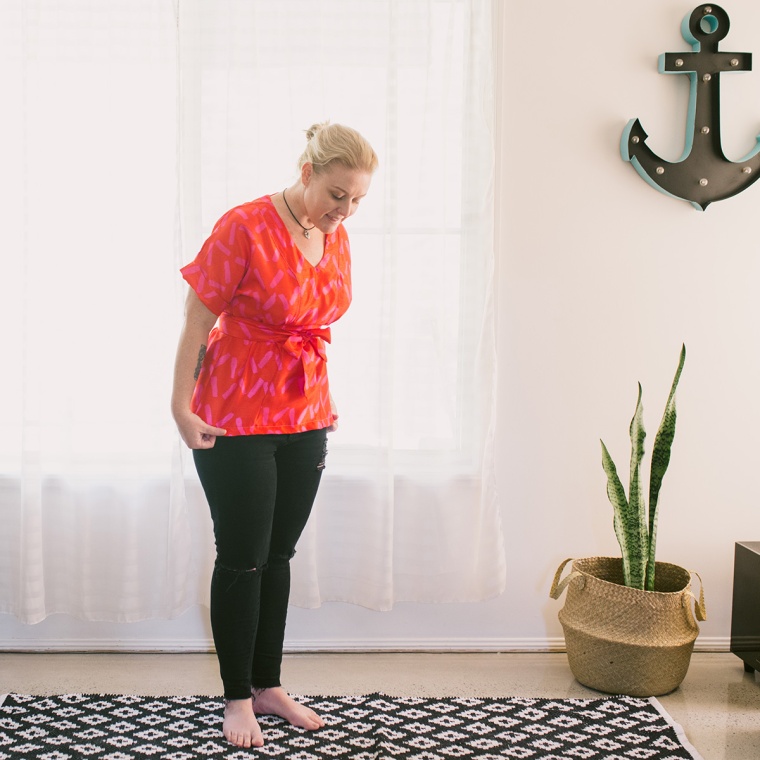
A girl obviously needs a black top to go with her tiger shorts, right? But a cooooool top. Something she hasn’t made before. Cue the Sweetheart Top from Gertie’s Vintage Casual book.
Yes please. I used some lovely rib knit I bought from The Remnant Warehouse recently. It’s Bec and Bridge, beautiful quality and super soft. With heaps of stretch. Which meant I probably should have sized the pattern down, but I went as per my measurements. It was a bit big so I did take it in at the side seams afterwards. I also took off around two inches from the hem as I will wear this tucked into my high waisted skirts and shorts.
Like so.
I used the less textured side of the rib. I’m not even sure which is the right side and which is the wrong side. Softer side is facing out, anyway.
Ok so I was a bit paranoid that printed shorts would look like PJs, so I turned the hem up to create cuffs and stitched them in place at the side seam and inseam.
I love my past Flints but unfortunately they’re a bit big now. And an upcoming holiday is the perfect reason to sew another pair right? This time from sweet drapey tencel that I picked up at Spotlight. The Rowan body suit is lovely soft Timeless Treasure cotton jersey from fabric.com.
I went for the tie version on the Flints and couldn’t help but to brighten the inside a touch with a vintage fabric covered button (I pick these up from op shops, but they are often just singles, which is perfect for this use) and some rayon off cuts. The rayon is the right weight for lining the tencel. I think quilting cotton would have been too heavy.
The closure on the Flints is pretty magic. It does your head in a little bit while you’re sewing them, but the instructions are really great and you just have to trust the process. There isn’t a zip, you just get into these bad boys by opening the pocket. Superb.
The Rowan bodysuit has nice details at the closure too. There’s not a fancy way to say it, but at the crotch. But who doesn’t love a fancy crotch? The facing pieces can be cut from just about anything. I used some soft lawn scraps I had. It’s a nice detail. Oh and I used those old metal snaps because I don’t have a snap press, which would obviously look much more professional. Still, they do the job and I can’t feel them at all when I’m wearing it.
So size wise the Rowan is perfect (straight large) but the Flints aren’t. To be honest, my body has changed a fair bit over the past few months and I’m still getting used to it. It seems it doesn’t matter if it’s weight loss or gain – it can still feel like your body isn’t quite yours when it changes. I made the straight medium in the Flints because I went by my waist measurement. I thought there would be enough ease in the hips and thighs but I really should have graded out to the large. My waist seems to be about a size different to the rest of me at the moment and I’m not really used to my new proportions yet.
They’re not as swingy as I’d like, but they’re still wearable. And who knows, my hips could catch up to my waist eventually. One can only hope. But even if they don’t, that’s fine too.
I know there’s a few sewists who’ve eliminated those front pleats, but I actually quite like them. They bring out my inner 80s mum chic.
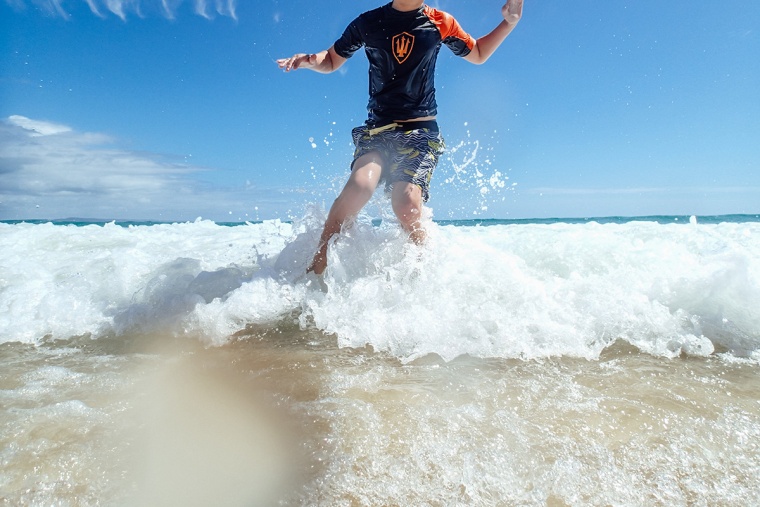
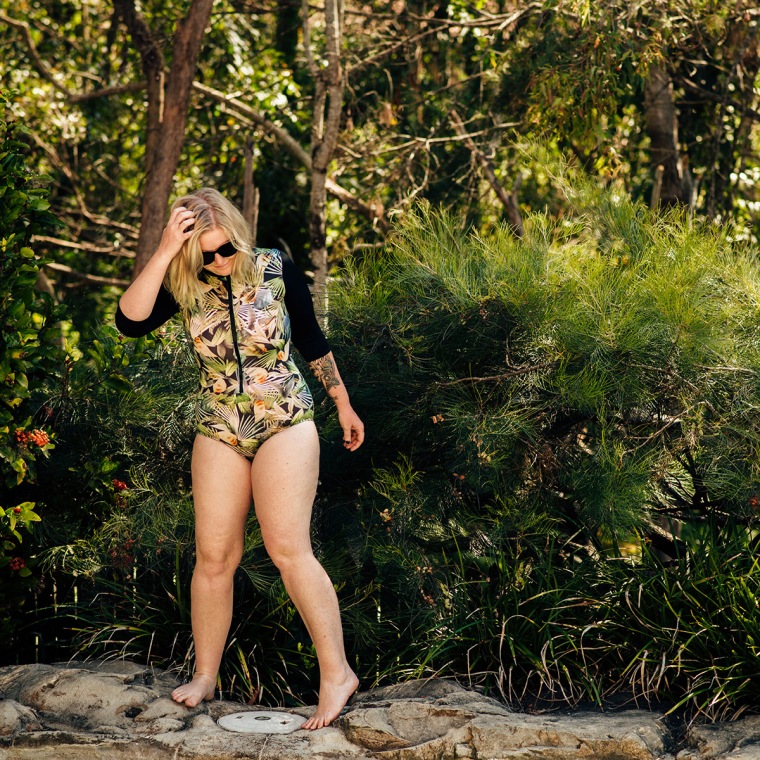
It gets hot here. We spend a lot of time in the water from about September through to May. And even though we wear sunscreen and hats, as well as staying out of the sun between 10am and 3pm, sometimes that’s just not enough.
So we wear rashies (I think they’re called rash guards in the US). They’re easy enough to buy for the kids but generally they are falling apart after one season. Not a big deal really because they’ve grown out of them anyway. But there’s not a lot of variety available for women. Maybe there’s not a huge market for them. They’re not exactly the height of beach fashion. But still, skin cancer is worse.
So mine is a couple of seasons old and is looking worse for wear. All stretched out and baggy. They don’t seem to be made out of quality fabric anymore. Time for an upgrade. I quite like the all in one situations, like a one piece with sleeves, but I’m yet to find one that’s the right shape for me. They all seem to have what I like to call ‘Baywatch Butt’, you know – that really high cut skimpy back? Which is fine, but not all that practical when I’m in the water photographing clients, because I do that occasionally. I want to make sure I can tackle the surf without getting distracted by a wedgie.
Enter Megan Nielsen’s Rowan. Oh yes. Yeah, I know it’s not a swimsuit pattern, but since when have I followed the rules? My tropical print spandex and swim elastic is from Pitt Trading and the spandex I used for the lining (which isn’t really lining) as well as the plain black is from The Remnant Warehouse. Both these stores are superb sources of swimmy stuff in Australia.
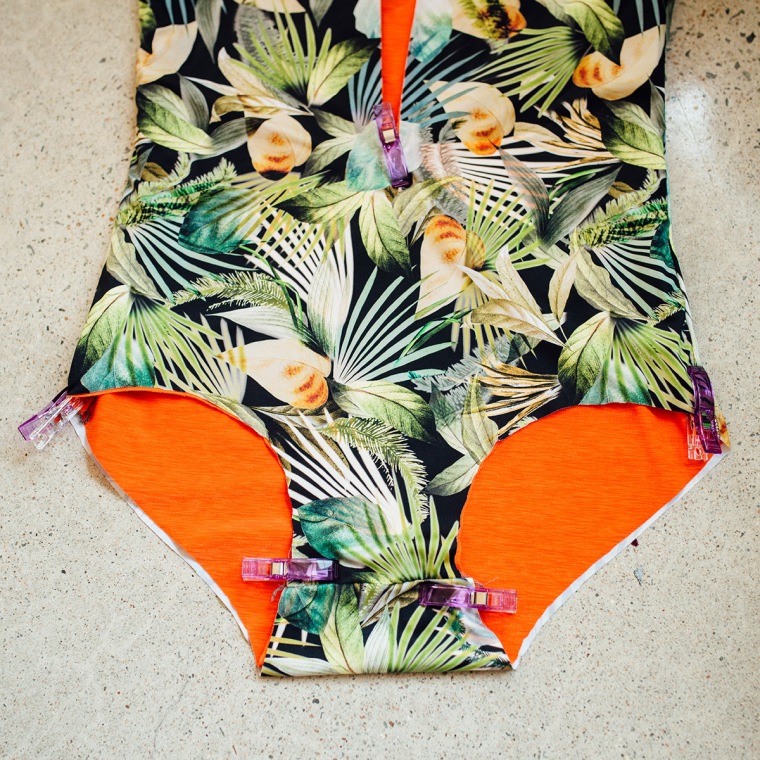
My original plan was to make a top from the Rowan pattern first, but that all went out the window when today decided to reach 31 degrees. DEFINITELY TIME TO START ON THE SWIMMERS. Risky really, but it all turned out pretty ok in the end. I’ve taken some work in progress shots this time, because the construction is a bit different to the normal bodysuit as it has to be fully lined, a zipper added and no crotch snaps. As mentioned above, my lining isn’t really lining, but spandex because I didn’t have enough black swim lining left. Both have a really similar amount of stretch so it works quite well and feels more supportive.
I pretty much made two of the bodysuits and then basted everything wrong sides together, which gives a pretty clean finish on the inside. The front is cut for the zipper (otherwise you wouldn’t be able to get into it, obviously). I attached the neckband while it was still open rather than stitching it into a loop first, so the zipper had somewhere to go. I overlocked the raw edges. Not that they need it – the spandex won’t fray. I just find it easier to work with.
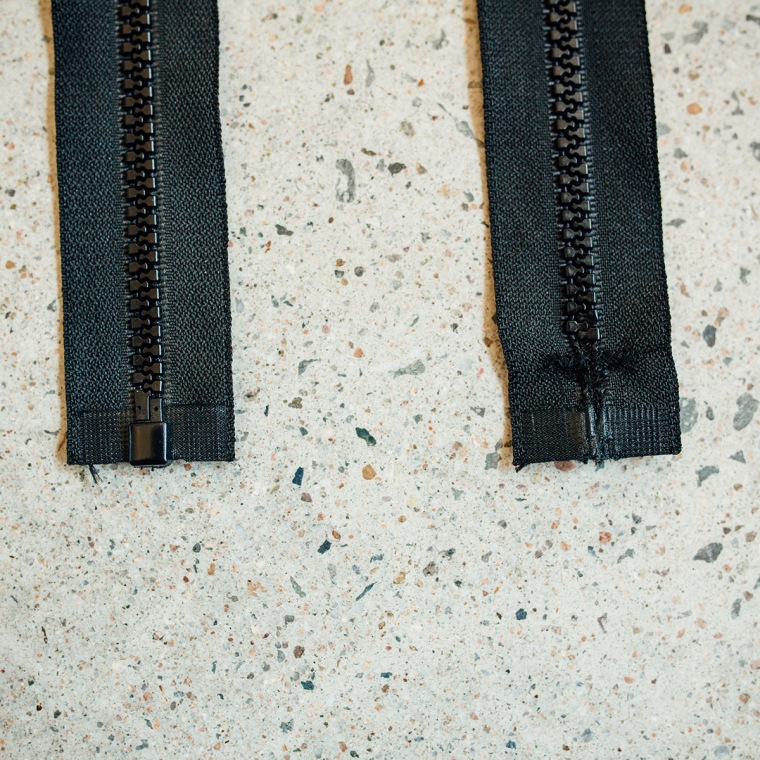
I could only get open end plastic zips, so I put a tack across it by hand and literally smashed off the end teeth with a hammer. Satisfying and effective. Then I added a bit of spandex across the end for comfort. Not my prettiest effort but no biggy.
And you know, I knew inserting this zip would be the biggest challenge of the entire thing. I went in all zen, even used interfacing on the edge of the swimmers because I totally knew that spandex would want to pucker and go wavy and be a bastard. It still did anyway. Probably not as much as it would have without stabilising the edges. But it was still a bugger and took longer than the rest of the construction put together. The end of it looked so horrendous that I ended up covering it with a little tab of fabric. Which in the end wasn’t the worst idea because I think it adds a bit of strength to a weak point.
The sleeves couldn’t go in flat (as per the instructions) because the side seams were already done, so they just went in the normal way. In the round? Set in? You know what I mean. Easy enough. Although make sure your overlocker doesn’t want to inhale everything around the sleeves. Mine does. I won this time though, I was bloody careful. Then elastic for the legs and you’re golden. I don’t love elastic in swimmers done this way. I prefer the look of bands. But that’s just nitpicking and also because I have delightfully thunderous thighs that elastic tends to cut into.
And she is done! It just occurred to me that I should have framed these better and actually got some water in the shot. So you’ll just have to believe that I am standing on the edge of the pool.
My absolute favoutire part of this pattern is the butt coverage. It’s perfect for my shape (which is mostly pancake butt). I find that most underwear patterns bag out between the back of my hip and leg and I usually have to take a dart out of the pattern piece. But not these babies! Nice and secure. I love the fit so much I think I might use it to draft some more knickers.
Fit wise, they are a smidge too small. I’m getting a bit of pulling at the zipper. My measurements put me between the M and the L. I made the M because I didn’t want to risk them being too big. I have converted underwear patterns into swimmers before and while the fit is ok when they’re dry, they get baggy and want to wash away once they hit the surf. This one is snugggggg and not going anywhere. If I wasn’t being lazy, I would have added a bit extra to allow for the zip because it’s seam allowance that the original pattern doesn’t have built in. I’ll definitely do that next time.
So the thing about using orange lining is that when you actually get wet, it will show through. But you know what? Nothing else shows through, so that’s a win. And there is my first official dip of the season. There will be more – Rowans and swims.
Betty because I was getting Betty Draper vibes after I finished this dress. Probably a more risque Betty, but Betty nonetheless. So I dragged on some red lippy and brought out the big black shades to channel her even further.
Isn’t it weird how one teeny tiny detail can mean the difference between strutting out of the house in your latest dress with all the confidence in the world or rocking in the corner of your bedroom with uncertainty?
This is one of those dresses! It’s only a keyhole right? But I still can’t decide. So strange for me. I generally make decisions in a heartbeat. Uncertainty isn’t my thing at all.
Let’s talk about B6413 anyway. I wrote it off when I first saw it because I assumed the top would be a nightmare to fit and the construction would be too much for my brain. Then I saw it pop up on a few clever women on Instagram and I was a bit more tempted. As it turns out, I couldn’t resist grabbing it when Butterick were having their $2.50 sale recently and I really wanted this one. Buying two makes the horrendous postage from the US worthwhile, right? Of course it does! I don’t know if these ones are even available on our shores yet, it seems to take forever for them to get over here.
So it turns out I was wrong. It’s fine, I can say it. The fit wasn’t a big deal and neither was the construction. And can I say what a relief it is to have a pattern envelope without eleventy billion different pieces and combinations inside? Very nice. Just the one dress without any variations. Of course I had to go ahead and do a gathered skirt because straight skirts aren’t my jam – which meant I only had to trace the bodice pieces, easy!
But this is another no bra dress. Do those sticky fillet thingies from the early 2000s still exist? Maybe they would work? Not sure. A regular bra definitely does not though.
When I first made it, the booby part (oh yes, I know all the technical sewing terms) was sitting too low. One false move and those wiiiide shoulders were heading south and the whole bodice was going to end up in a puddle around my waist. It all felt very precarious. After mucking about a bit, I decided the best fix was going to be taking a wedge out where the bodice meets the sleeve. Even though that meant unpicking all my hard work. WOE. I did it though. I took 2.5cm out of each one and it’s much better now. More secure. Less likely to end in a wardrobe malfunction. Actually, when I had it all opened back up I was considering working some bra cups into it, but I couldn’t figure out how to secure them without it being seen from the outside. I’m not sure how much of a difference it would have made anyway.
I haven’t told you about my fabric! I bought it from an op shop but wasn’t sure what it was. It’s very soft, like a lawn or voile. I assumed the squares were for quilting, but the good ladies of Instagram told me that they are handkerchief panels! How clever! Considering I have no use for 4 metres of hankies though, I decided it wouldn’t be a bad choice for this dress. If I hated it or it didn’t fit, no great loss. I still have over a metre of it left. I got a bit creative with my cutting. The fashion police might call the black band around my waist UNFLATTERING, but I think it’s interesting. See that bow tie look? INTENTIONAL. Proud of that effort actually.
I used the same fabric for the lining, which is mildly confusing but I had so much of the fabric that it seemed sensible. I marked the lining so I knew which was which when I was sewing. I added side seam pockets and laughed in the face of slip stitching. Forgive me. This is it inside out, which barely looks any different to right side out.
Size wise, I’m 41/32/41, which puts me in a Butterick 18 but previous experience tells me that I have to drop to at least a 16 (where finished measurements put me). My last Gertie Butterick was still too big at a 16 though, so I dropped to a 14 on this one. This isn’t the style of top that you want extra space in. It’s borderline at the waist (could be bigger) but there is still a bit of room in the booby part. I’m a D/DD too, so if you’re smaller in the bust you might find it a bit big in that part.
Ooh and if you’re wondering (I totally was) if there’s visible boob from side on, there is. Ha. Not a lot though and honestly, if someone is going looking for that, then they deserve to cop an eyeful.
Hooley dooley I can talk a lot. Sorry. I think I’m done now. And actually, I’m done with the indecision too. I’m ok with this dress after talking about it so much. Bra be damned, I’ve talked myself around.
It was a post on Cotton and Steel’s instagram that started it all for me. They’d shared a post by Sarah who’d made the most stunning version of this dress from C&S rayon (her design). I bought the pattern less than five minutes later. I so rarely do that. I’m allergic to PDFs so bought the paper version and had to have it shipped from the US. But I just had to have it. And usually I’d sit there an imagine what fabric I’d use and how I’d make it mine, but I really just want an exact copy of Sarah’s dress. To be fair, I think she’s a legend and I love pretty much everything she does.
The pattern arrived yesterday after about a week or so of winging its way across the seas and I basically ignored my to do list, shoved everything off my desk (not really), traced it out and decided I needed to sew this RIGHT AWAY. Problem was, I didn’t have any suitable fabric. Which seems hilarious if you’ve seen my stash, but most of it is quilting cotton and this dress really needs something with more drape. I dug around and pulled out a few options before actually reading the back of the pattern. I knew the dress was fabric hungry (4.3m) and though, no worries – I’ll make the top first. HOW SENSIBLE OF ME. It would be a toile of sorts and I never make them. But heck, if there’s fitting issues it saves wasting 4.3m of fabric (how on earth do people think sewing your own clothes cheap? Quick calculation: 4m x $20/m = $80 vs about $30 for the Target equivalent. Anyway, I digress).
Turns out the top likes a bit of fabric too (3.3m) and the only suitable amount I had was some outlandish faux silk that I grabbed from Spotlight over a year ago. Now don’t get me wrong, I love this crazy fabric. But it’s pretty bright, even for me. Still, I love those Ken Done/Gorman vibes it gives me. What I don’t love? It behaves about as well as a three year old getting dragged through Woolies right on nap time. After a birthday party. And after you took their party bag away. A ticking time bomb of antagonism. Dramatic, no?
I had been saving it for a skirt, but nup – I had to make this top right now. She’ll be right, mate. No she won’t. The pattern is amazing, truly. Yes, there are a number of pieces but the instructions are very clear and detailed and it is finished beautifully. That was part of the problem. My darling faux silk doesn’t want to be pressed. You can’t have the iron too hot or the fabric will melt but even if pressed under another cloth, she just wanted to spring back up like nothing had ever happened. She could not be steamed into submission. Which was a big problem for that front yoke. Ugh. It’s making me cringe to show you, but I have to.
Really I should unpick that whole front yoke and hand sew it into place. I might. But I probably won’t. About halfway through I realised I wasn’t going to love it as much as I wanted to, but continued because I’m stubborn like that. Look at the cool yoke and box pleat at the back though. I love the whole Japanese vibe. No closures and the obi style belt ties make it super cool.
I thought maybe wearing it with ripped skinny jeans would make me feel less high school art teacher and it actually does. But I’m still on the fence a bit. I will definitely make the dress version, but I just need the right fabric. I know it will redeem itself.
I probably just need to give it a week or so and I will change my mind. To be honest, it’s been a rough week or so. I wasn’t going to talk about it, but a few people have commented, so here’s the overshare. Yes, I have lost some weight. I have been plagued with weird skin problems since I was 14 and at the age of 36, I am done with it. So done. My doctor’s final step was to try some heavy medication that I wasn’t comfortable with so I took matters into my own hands and overhauled what I eat. And guess what? It worked. For the first three months my skin was the clearest it’s been in my adult life. With that change came some weight loss and that’s the reason I’ve been sewing so much for myself recently – half my wardrobe no longer fits. Then about two weeks ago I started getting a new skin problem, not cystic acne this time, but red itchy patches of psoriasis. I’ve been told it’s most likely a reaction to dairy (which I’ve been eating a lot more of recently). So now I’m trialing dropping dairy. It’s harder than dropping sugar and grains because damn, I love dairy. Those cows, they know how to make some delicious stuff.
A while back, I was lucky enough to be asked to write a guest post for The Curvy Sewing Collective and that was published over the weekend. It was really exciting for me but one tiny FB comment was made about me not being ‘curvy’. And really, why should I let that bother me? But you know, it did. For my whole life, I’ve felt like the fat girl and then, when I felt like I finally fit in somewhere, I’m not curvy enough either? It annoyed me far more than it should have. That’s the thing with blogging and sewing blogging in particular, I think. Body comments will be made. For the most part though, it’s all very positive and rewarding and I don’t do it for anyone but me. I’m selfish like that. So you’re stuck with me, internet.
Ack, too many words. The pattern is tops, my fabric was not. But I’ll be back with another version when I get some kick ass fabric. The end.
Here’s the thing about shorts. I don’t wear them. At least since I’ve had kids anyway. My thighs are something I’ve always felt compelled to disguise, so shorts have been off the menu. However, when I saw Megan’s Flint pattern for the first time, I knew I had to have it. The shorts didn’t blip on my radar, but those pants, holy hell – I needed those pants on my body STAT.
So when my pattern arrived yesterday from the lovely Stitch 56, I opened it to have a look and decided that I’d trace it out then and there, but buy some fabric for the pants when I had a chance. Except then I got a bit nervous. I’d not really made pants before (only Megan’s Tania culottes) and even though I rarely make toiles, I figured it was probably a good idea for these – especially since the pants require about 3 metres of fabric and I didn’t want to waste that. So off I toddled to my sewing room and went over my stash, looking for enough fabric suitable for a toile. I remembered I had this big denim off cut picked up from our local op shop last week. Weird for me, since I don’t really sew with denim, but it was cheap and heavy duty and I figured it would come in handy for something. Not enough for pants, but hey – I could make shorts right? This was just for fitting purposes, I don’t actually have to wear them, do I?
Except yes I do have to wear them because they’re bloody awesome! Waaaaaaahhhhhh! They fit my fat thighs, with room! They have fun pocket lining! They have cute buttons! They wrap in the coolest way! The fit is pretty great too. I don’t need to change anything. Although a bonus of my measurements (42/34/44) is that I fit exactly into a lot of patterns without any changes. In MN patterns I’m an XL.
(I took my pics in my sewing room because there’s the remnants of a tropical cyclone raging outside. School has been cancelled, husband is supposed to be home from work. It’s quite a day. Sewing room was the only place that had a sliver of light. Sorry that they’re a bit crap. And yeah, I could have waited for pics but I’m wearing them today, sooooo….).
I used a scrap of anchor chambray for the pocket lining, because of course nautical. I even used little silver anchor buttons that I’d been hoarding forever on the waistband. Because nautical. But then, they didn’t look quite right. Maybe a bit toooo yacht club. So I changed them for little bunny and moon fabric covered ones instead. Also from an op shop. Fabric is Luna Sol.
Which brings the total cost of these shorts to approximately $6.50. That’s without my labor costs, obviously – but let’s conveniently ignore that. Jokes aside, they only took me just over an hour and a half to sew, which isn’t bad.
So besides going together really well, feeling somewhat high end and generally just being really cool, you know what else I love about Megan’s patterns? (and I know this is a soppy love fest, but I swear I’m not being paid and I paid for my own patterns, I just really like her stuff) – there’s always suggestions in the instructions for tweaks to make them your own. One of the suggestions was to add buttons to the other side of the waistband too. So I did. Now I have cool shorts. Pant to come when I find something suitably swishy and drapey and delightful.


 Look, I’m a bit of a fraud because my body tends to reject chips (fries, chips to us here in Australia), even though I love their crispy, carby, salty goodness. Most of the time my skin is like ‘nah, we aren’t about those anymore. Have some acne for your attempt, though’. Who could resist this print though? It’s a bloody winner.
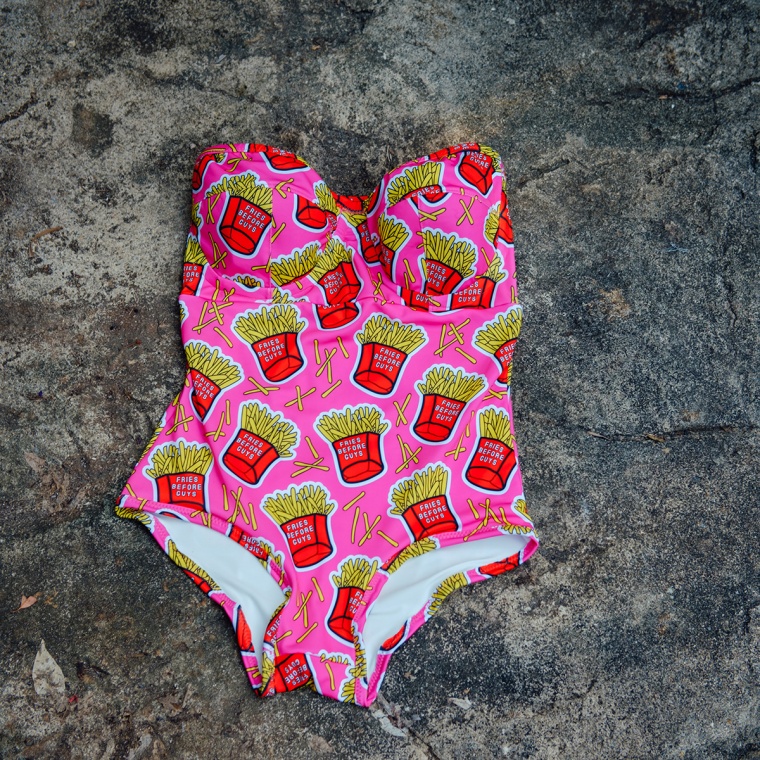


 Yes, shorts. Even though I don’t wear them often. In fact, it’s only been over the last 12 months that I’ve started wearing them again. I reckon shorts didn’t touch my body for around 8 years at least. But no more. I’ve come to realise cellulite and chunky thighs are normal and shorts are perfect for our climate.